
For many homeowners, the side yard is an afterthought—a narrow, muddy trench used to store garbage bins, a spare ladder, or a tangled garden hose. It is the “no man’s land” between your house and the neighbor’s fence. But if you live in a city with small lots, a townhome with a postage-stamp backyard, or simply want to declutter your garage, that skinny side yard is prime real estate.
Building a shed in a skinny side yard is not the same as erecting a standard 10×12 barn in an open field. It requires micro-logistics, precision measuring, and a healthy respect for gravity and property lines. You cannot simply drop a kit from Home Depot into a 4-foot gap.
This 2,500-word guide will walk you through the engineering, the legal headaches, and the sweat equity required to build a custom, narrow shed that fits like a glove. We will cover design constraints, foundation hacks for tight spaces, fabrication techniques, and how to roof the damn thing when you can’t stand on both sides.

I’ve broken down the article into 9 parts…Let’s Begin.
Quick Navigation Menu
Part 1: The Geometry of “Skinny”
Part 2: The Bureaucracy (Permits and Setbacks)
Part 3: The Foundation (Working in a Ditch)
Part 4: Designing the Skinny Shed (The Blueprint)
Part 5: The Build Sequence (How to fit a square peg)
Part 6: The Logistics of Assembly (Tools & Human Access)
Part 7: Finishing & Storage Optimization
Part 8: The Nightmare Scenarios (And How to Fix Them)
Part 1: The Geometry of “Skinny”
Defining the Space
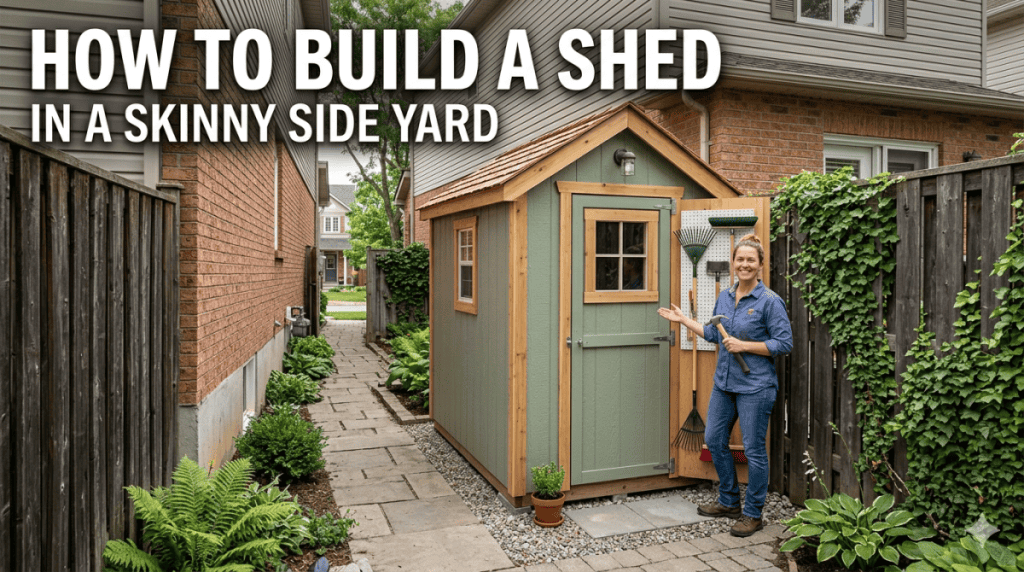
Before you buy a single nail, you need to understand the exact dimensions of your battleground. A “skinny side yard” typically ranges from 3 feet to 8 feet wide. Anything less than 3 feet, and you are building a tool locker, not a walk-in shed. Anything over 8 feet, and you don’t have a skinny problem; you have a regular yard.
The Golden Rule: You need to leave at least 6 inches of air gap between the shed wall and your house siding (for moisture management) and at least 12 inches (check local code) between the shed and the property line or neighbor’s fence.

Math Example:
-
Total width of side yard: 60 inches (5 feet)
-
Subtract house clearance: 6 inches
-
Subtract property line clearance: 12 inches
-
Maximum shed width: 42 inches.
That is narrow. You cannot fit a standard riding mower, but you can fit shovels, a snowblower, a wheelbarrow, and garden chemicals. Accept this constraint now.
Shed Orientation: Parallel vs. Perpendicular
You have two layout choices:
-
Parallel (The Hallway): The shed runs the length of the house. The door is on the narrow end (gable end). This is optimal for long tools like rakes and ladders. You walk into the narrow space.
-
Perpendicular (The Bump-Out): The shed sticks out from the house into the yard. This is rare in skinny side yards but works if the yard is short and wide.
For 90% of skinny side yards, the Parallel “Shotgun” Shed is the winner. You will access it from the front or back of the house, walking down a narrow aisle of stored goods.
The “Assembly Access” Problem
Here is the paradox: To build the shed, you need to stand where the shed will eventually be. If the shed is only 42 inches wide, you can stand inside that space. But what about the outside of the shed? You will need to sheath, side, and paint the exterior wall that faces the neighbor’s fence.
If the gap between your planned shed and the fence is only 12 inches, a human body cannot fit there to drive screws. You must account for this during the design phase.
Solution: The “Fence-Facing Wall” must be pre-built, pre-painted, and pre-sheathed before you erect the shed. You will build this wall on the ground, finish it entirely, and then tilt it up into place.
Part 2: The Bureaucracy (Permits and Setbacks)
Do not skip this. A skinny side yard shed is the most likely structure to get you in trouble with the city. Neighbors in narrow lots are notoriously sensitive about “encroachment.”

Setbacks
Check your local zoning code for “accessory structures.” In many urban areas, a shed under 120 square feet doesn’t need a permit, but it must abide by setbacks.
-
House to shed: Usually 0 inches if attached, 3-6 inches if detached (fire code).
-
Shed to property line: Typically 2 to 5 feet. But—some jurisdictions allow “zero lot line” for sheds under 50 sq ft if made of non-combustible materials. If your side yard is truly skinny, you might need a variance. This is worth the $150 filing fee, or you will be tearing it down.
The “Attached vs. Detached” Loophole
If you attach the shed to your house (bolt it into the siding or foundation), it is often considered an “addition” rather than a shed. This usually requires a stricter permit (electrical, structural). However, a “detached” shed standing 3 inches away from the house is usually easier to permit.
Pro Tip: Build it on skids (wooden runners). The city defines a shed on skids as “temporary/movable” in many jurisdictions, which bypasses permanent structure setbacks.
Part 3: The Foundation (Working in a Ditch)
Your side yard likely slopes away from the house for drainage. You cannot pour a concrete slab in a 4-foot wide alley between two walls—you can’t get a concrete truck or a mixer in there.
Option A: The Floating Timber Frame (Best for < 6 ft width)
This is the skinny-yard champion. You build a rectangular frame out of pressure-treated 4x4s or 4x6s.
-
Dig down 4 inches inside the frame location.
-
Lay landscape fabric and 3 inches of 3/4″ crushed stone (drains water).
-
Place the timber frame directly on the stone.
-
Drill holes and drive 24″ rebar stakes (or “earth anchors”) through the timbers into the ground to prevent shifting.
Option B: Pier and Beam (For wet climates)

If you have poor drainage, you want the shed off the ground.
-
Use a post-hole digger (a miserable job in a narrow space) to dig 24″ deep holes every 4 feet.
-
Fill with concrete and set galvanized post bases.
-
Run beams between the posts.
-
Warning: You lose interior height because the floor is raised. If your shed is only 6 feet tall, losing 8 inches to a raised floor hurts.
Option C: The “Skid Row” (Zero excavation)
Buy two 12-foot pressure-treated 6x6s. Lay them parallel 3 feet apart. Build your shed floor on top. To keep rodents out, later spray foam the gap underneath. This is the easiest but shortest-lived (10-15 years).
Critical Drainage: Before you lay a single stone, fix your gutter downspouts. If the roof of your new shed dumps water onto the neighbor’s side, you will get a cease-and-desist letter. Route water away using a French drain under the shed floor.
Part 4: Designing the Skinny Shed (The Blueprint)
Let’s design a 42″ wide x 10′ long x 7′ tall shed. This fits a standard side yard.
Framing Lumber Math
-
Walls: 2×4 lumber. But you are building two long walls (front and back) and two short walls (ends).
-
The problem with 2x4s: A 2×4 is actually 3.5 inches thick. If your exterior is 42″ wide, the interior width becomes 42″ – 3.5″ (one wall) – 3.5″ (other wall) = 35 inches. That is fine for walking, but tight for a lawn mower.
-
Upgrade: Use 2×3 lumber for the walls. A 2×3 is 2.5 inches thick. Interior width: 42 – 2.5 – 2.5 = 37 inches. You just gained 2 precious inches.
Trusses vs. Rafters
In a skinny shed, standard trusses are stupid. A gable roof (triangle) will steal headroom.
-
Shed Roof (Single Slope): The roof slopes from high (against the house) to low (toward the fence). This is the only logical roof for a skinny side yard. The high side catches the house’s shadow, and the low side stays below the fence line to avoid disputes.
-
Slope ratio: 1/4 inch per foot is too flat. Go for 2/12 or 3/12 pitch. That means for a 3.5-foot span, the roof drops about 7 inches from house to fence.
The Door
You cannot fit a standard 36″ pre-hung door if your shed is 42″ wide (because the door frame plus jamb is 38″ — you have only 4 inches for wall structure). You have two options:
-
Slider Barn Door (outside): Mount the track on the 42″ wall. The door slides to the side. Since the wall is short, the door will overhang the end of the shed. This is fine.
-
Dutch Half-Door (smaller): Build a 30″ wide door. You have to pivot your shoulders to enter, but it works.
Part 5: The Build Sequence (How to fit a square peg)
Because you cannot walk around the structure, the assembly order is critical.

Step 1: Build the Floor (Off-site or in place)
Build the floor frame (rim joists and floor joists) in the driveway. Sheath it with 3/4″ pressure-treated plywood. Drag the finished floor panel into the side yard and set it on your foundation. Lag bolt it down.
Step 2: The “Fence Wall” (Pre-fab)
Lay 2×3 studs 24″ on center on your driveway. Attach the bottom plate and top plate. Before standing it up:
-
Nail on the exterior sheathing (OSB or plywood).
-
Staple house wrap.
-
Screw on the siding (T1-11 or cedar shiplap).
-
Paint the exterior side.
You now have a finished wall panel that is 42″ wide x 7′ tall. It is heavy. You need two people to carry it like a stretcher into the side yard.
Step 3: Stand the Fence Wall
Lean the finished wall against the fence side of your floor. Tilt it up so it rests on the edge of the floor. Screw the bottom plate to the floor through the subfloor. Temporarily brace it with a 2×4 wedged against the house roof eaves (not the ground, because there is no room).
You can only brace this wall from the inside because the outside is against the fence.
Step 4: The “House Wall” (Built in place)
Now stand inside the floor frame (the 35″ wide aisle). Build the wall that faces the house. You cannot pre-build this one easily because you need to fit it around the house siding, outlets, or gas meters.
-
Cut studs to height.
-
Nail the top and bottom plates.
-
Lift the wall into place.
-
Because the house is 6 inches away, you can walk behind this wall (between it and the house) to drive screws from the outside.
Note: If your house has existing horizontal siding, do not attach the shed to it. Let the shed float next to it. Attaching creates a moisture bridge and rot.

Step 5: The End Walls (The tricky parts)
Your shed is long (10 feet). The two ends (front gable and back gable) are only 35″ wide now because the long walls are up.
-
Frame the end walls on the ground inside the house (since you have no yard space).
-
Walk them down the side yard like a ladder.
-
Tip them into place.
-
Correction: You can’t tip them because the long walls are in the way. You must “stud-in-place.” This means cutting each stud and header individually and toe-nailing it between the two existing walls. It is slower, but it works 100% of the time.
Step 6: The Single-Slope Roof (Installation)
You now have a box. The top plates are level? They shouldn’t be.
-
The “House Wall” top plate should be 8 inches higher than the “Fence Wall” top plate.
-
Run 2×4 “rafter tails” from the high wall to the low wall every 24 inches. These are just planks resting on the plates.
-
Because the span is only 42 inches, you don’t need birdsmouth cuts. Just lay the 2×4 flat (2″ tall) or on edge (4″ tall). Lay them on edge for strength.
How to sheath a roof in a skinny yard:
You cannot walk on the roof because there is no ladder access on the fence side. Use a “rolling scaffold” inside the shed. Stand on the floor inside and push the plywood up through the rafter bays. Nail from above by leaning out a window? No.
Better method: Buy 10-foot long metal roofing panels. You can slide them across the rafters from the house side (standing on a ladder against the house). Metal roofing is cut to length and weighs 1/5th of plywood+shingles. Do not use asphalt shingles on a skinny shed—you cannot step back to see the lines.
Part 6: The Logistics of Assembly (Tools & Human Access)
You need to rethink your tool belt.
The “Bucket System”

You cannot carry a 12-foot 2×4 horizontally down a 4-foot wide alley. You will hit the house and the fence. You must carry lumber vertically.
-
Load lumber into the yard via the front gate.
-
Stand it on end.
-
Walk it down the yard like a flag pole.
Power Tools
-
Impact Driver: Mandatory. You cannot swing a hammer in a 36″ space (your elbow will hit the fence).
-
Right-Angle Drill Attachment: You will need this to screw the siding onto the fence wall from the inside (shooting screws backwards).
-
Magnetic Wristband: Because you will drop screws. When you drop a screw in a 12″ gap between the shed and the fence, it is gone forever.
Lighting (Pre-wire before sheathing)
You will regret not having power. Run an exterior-rated extension cord (UF cable) under the floor joists before putting the subfloor down. Install a single LED light fixture and one outlet.
-
Why now? Because once the walls are up, you cannot get under the floor. The crawl space is 4 inches high.
Part 7: Finishing & Storage Optimization
You have the shell built. Now, make it functional.
Interior Storage Systems
A 42″ wide interior means standard shelving from Costco (24″ deep) will block the aisle. You need custom storage:
-
French Cleat Walls: Run a 2×4 French cleat system on the long walls. Hang shovels, rakes, and brooms flat against the wall. Nothing should sit on the floor except a wheelbarrow.
-
The “Tilt-Out” Bin Wall: Build shallow cabinets (8″ deep) on the house-facing wall. Store small items like seed packets, twine, and gloves.
-
Overhead Loft: Because the roof is single-slope, the space near the house wall is 7’6″ tall. Build a 12″ deep shelf up there for paint cans and rarely used items. Do not put heavy things here.
Ventilation

Skinny side yards get no wind and maximum humidity. Your tools will rust.
-
Install a solar-powered gable fan on the end wall.
-
Cut a 6″ hole and cover it with hardware cloth (not screen—rats chew through screen) near the top and bottom for convection.
Security
Thieves love side yards—they are hidden from the street.
-
Do not put a padlock on the outside. It screams “valuables inside.”
-
Install a hidden slide bolt on the inside of the door. You access it by reaching through a small, fake vent. Thieves won’t find it.
-
Alternatively, use a Wi-Fi connected deadbolt (if your Wi-Fi reaches).
Part 8: The Nightmare Scenarios (And How to Fix Them)
Scenario 1: The Neighbor’s Fence is Rotting
You built your shed 12 inches from a fence that is now falling over. To replace the fence, the neighbor needs access to both sides. They cannot get to their side because your shed is in the way.
Solution: Before building, offer to pay for a concrete block wall or a metal post-and-panel fence on your property line. Make it bomb-proof so it outlives the shed.
Scenario 2: The Gas Meter
Your gas meter is on the side yard. Code requires 36 inches of clearance in front of the meter. You cannot build a shed within 36 inches of the regulator.
Solution: End the shed 4 feet short of the meter, or build the shed with a removable wall section that acts as a “service alcove.”
Scenario 3: HOA Restrictions
Your HOA says “no outbuildings visible from the street.” A skinny side yard shed is usually invisible. However, if your roof peaks above the fence line, it is visible.
Fix: Make the roof a “low-profile green roof.” Plant sedum on top. The HOA thinks it’s a landscaping feature.
Part 9: Cost Breakdown
Building skinny is more expensive per square foot than building big because you waste cuts and labor.
-
Lumber (2x3s, PT 4x4s): $400
-
Plywood (3/4″ floor, 1/2″ walls): $250
-
Metal Roofing (10′ panels): $200
-
Siding (T1-11 4×8 sheets): $150
-
Fasteners (screws, nails, anchors): $80
-
Door (slider hardware + wood): $120
-
Foundation gravel: $60
-
Paint/Primer: $50
-
Misc (LED, solar fan): $100
Total (DIY): ~$1,410
Hired Contractor estimate: 5,000−5,000−8,000 (they charge a “cramped access” premium).
Conclusion: The Victory Lap
When you finish this shed, step back. You won’t be able to step back far, because you are still in the skinny side yard. But go to the kitchen window and look down.
You have taken a dead space—a muddy, forgotten corridor—and turned it into a high-efficiency machine. Every shovel has a home. The lawn mower is no longer tripping you in the garage.
Building a shed in a skinny side yard is not about carpentry; it is about logistics. You learned how to pre-assemble walls you couldn’t reach, how to raft a roof without standing on it, and how to drive a screw sideways while lying on your back. That is a skill set that separates the weekend warrior from the true space hacker.
Now go put your tools away in your beautiful, narrow, perfect shed. Just remember to walk in sideways.