
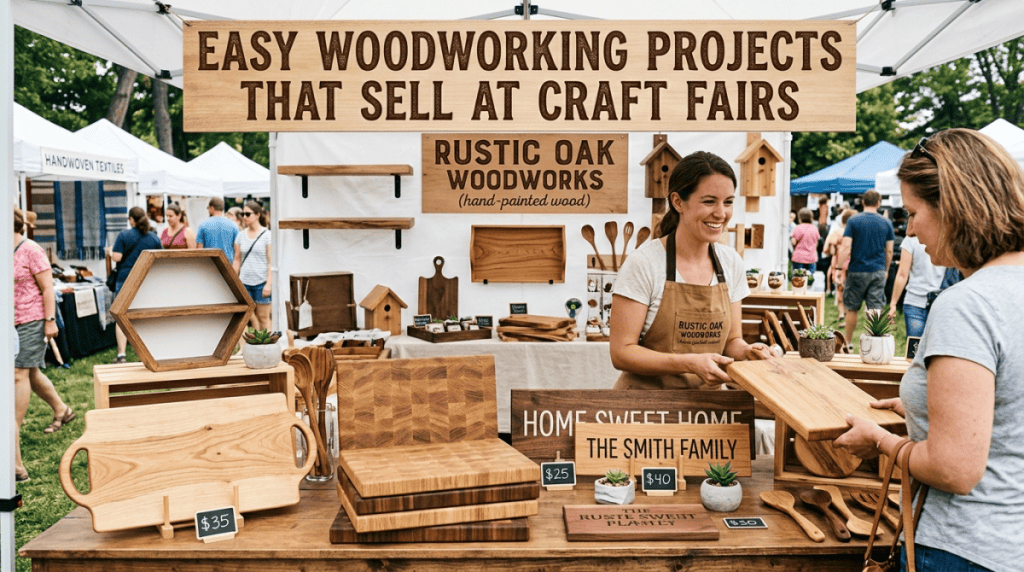
Discover the most profitable, easy woodworking projects that sell at craft fairs. From cutting boards to porch signs, learn what to build and how to price it.
There is a certain magic to a craft fair. The smell of popcorn wafting from the food truck, the strumming of a local acoustic guitar, and the vibrant colors of handmade quilts and pottery create an atmosphere of creativity and community. But for woodworkers, the craft fair circuit represents something else entirely: an opportunity.
In a world of mass-produced, flat-pack furniture and plastic trinkets, there is a growing demand for authenticity. People are willing to pay a premium for items that have a story, that feel “real,” and that are made with care. However, the thought of preparing for a craft fair can be daunting. You might look at the intricate, heirloom-quality furniture pieces on Pinterest and think, “There is no way I can compete with that.”
The good news is that you don’t have to be a master carpenter to make money in this space. The best-selling items at craft fairs are often the simplest ones. They are accessible, affordable, and fly off the shelves because they appeal to the impulse buyer, not just the collector.
This guide will walk you through the most profitable and easy woodworking projects that sell at craft fairs. I will cover the staple items that are guaranteed to move, the pricing psychology you need to understand, and the finishing secrets that separate a homemade trinket from a high-end piece of artisan decor.
From Sawdust to Sales: Easy Woodworking Projects That Sell at Craft Fairs
Section 1: Easy Woodworking Projects Items (High Volume, Low Complexity)
Section 2: The “Big Ticket” Items (Higher Margin, Slightly More Skill)
Section 3: The “Trendy” Gifts (Low Wood, High Design)
Section 4: The “Scrap Wood” Money Makers (Zero Waste)
Section 5: The Art of Pricing (Don’t Sell Yourself Short)
Section 6: Finishing Secrets That Seal the Deal
Section 7: Display and Booth Setup
Section 8: Marketing and The “Upsell”
Conclusion: Start Small, Learn Fast
Additional Bonus Tips for Success
Related Reading
15 Easy Woodworking Projects That Require Only Basic Tools
Section 1: Easy Woodworking Projects Items (High Volume, Low Complexity)
Every successful craft fair vendor needs a “bread and butter” item. These are the projects that you can batch-build in your workshop on a rainy Saturday. They are cheap to make, quick to finish, and have a low enough price point that customers don’t hesitate to buy.
- The Classic Rustic Cutting Board
When you looking for easy woodworking projects that sell at craft fairs, the cutting board is almost always number one. Why? Because everyone needs one, and they make fantastic gifts.
The Build:
You don’t need exotic hardwoods or complex joinery. While end-grain boards are beautiful, they require a lot of time. Edge-grain cutting boards are much easier and still command a high price.
- Wood Choices: Maple, Walnut, and Cherry are the “holy trinity” of cutting boards. They are hard enough to withstand knives but gentle on the blades.
- The Design: A simple “striped” board made by alternating the colors of two types of wood (e.g., Walnut and Maple) requires only a table saw, glue, and clamps.
- Variation: Instead of a large board, make smaller “cheese boards” or “charcuterie boards.” They use less material, are easier to sell, and often sell for just a few dollars less than a massive carving board.
The Marketing:
When selling these, do not just set them on the table. Stand them up on a display stand. Sand them to a silky smooth finish and apply a food-safe mineral oil and beeswax finish. The way they feel in the customer’s hand will sell them.
- The Dough Bowl Candle Holder
You don’t have to turn wood to sell it. The “live edge” and “rustic” trends are still going strong. One of the easiest projects is the “Dough Bowl” candle holder.
The Build:
Take a slab of wood (or even a pine 2×4) and hollow out a “canoe” shape in the center using a router with a bowl bit. You can make this look incredibly expensive by using a piece of firewood or a slab with bark on the sides.
- The “Cheat”: If you don’t have a router, you can just glue two pieces of wood together at a 90-degree angle to create a pedestal or “cradle” for a large jar candle. However, hollowing out a log is surprisingly easy and yields high returns.
The Profit:
These sell like hotcakes during the fall and winter holidays. You can price them at $35-$50 depending on the size.
- The Wall-Mounted Bottle Opener
Everyone loves a cold beer. A wall-mounted bottle opener made from a reclaimed pallet or a live-edge slab is a top-tier guy-gift.
The Build:
- Cut a rectangle or oval from a 2×4.
- Sand it heavily to ensure no splinters.
- Install a high-quality, heavy-duty cast-iron bottle opener on the front.
- Add a small metal or wooden “catch cup” below it to catch the bottle caps.
Why it sells:
It is functional and decorative. Men love them for garages and man-caves, and women love them for outdoor patios. It is a great way to use up scrap wood.
Section 2: The “Big Ticket” Items (Higher Margin, Slightly More Skill)
While the bread-and-butter items pay for your booth fee, the “big ticket” items pay your rent. These projects require a bit more precision but are still well within the skill set of an intermediate woodworker.
- The Rustic “Farmhouse” Sign
If you have a CNC machine or even a simple stencil set, signs are a goldmine. However, you don’t need fancy machinery. “Reverse Canvas” signs or plank signs are incredibly popular.
The Build:
- Take a canvas from a craft store and remove the staples.
- Flip the frame over and stretch a piece of wood paneling across it.
- Using Cricut vinyl as a stencil, paint on a phrase (e.g., “Home,” “Gather,” or “Eat”).
- Sand the edges to give it a distressed look.
The Sales Pitch:
The secret to selling signs is variety. You cannot have just one. You need 10 or 15 different phrases so that when someone likes the style but doesn’t like the word “Home,” you can show them “Family” or “Blessed.” Personalization sells. If you can offer custom text at a higher price, you will instantly double your profit on this item.
- The Hexagon or Diamond Shelf
Geometric shelves are huge on Instagram and Pinterest. They are minimal, modern, and a great way to use up plywood.
The Build:
This involves cutting wood at 30 or 45-degree angles and glueing them together to form a honeycomb or diamond shape. Because they are small, you can mount them flush against a wall.
The Assembly Line:
The trick here is making an assembly line. Use a miter saw to cut all your angles at once, then clamp them up using a strap clamp. You can make four or five of these in a single hour of shop time.
- The “Porch Leaner”
This is one of the most profitable woodworking projects that sell because it taps into the home decor market.
The Build:
Take a 1×4 or 1×6 plank of cedar or pine. Cut it to about 4 to 5 feet tall. Attach a smaller board horizontally in the middle to act as a shelf. Then, add a wire hanger or a chain to the top.
The Use:
Customers place a small potted plant or a candle on the shelf and lean it against the wall by their front door. It adds instant curb appeal.
The Upsell:
Sell these “bare” for the DIYers, or paint them with chalk paint and stencil a seasonal greeting (like “Hello Fall”) on them. The painted ones will command double the price.
Section 3: The “Trendy” Gifts (Low Wood, High Design)
These items don’t use much wood, which means the materials cost is incredibly low. However, they require an eye for design and aesthetics.
- Hanging Earring Organizers
This is a niche item that appeals specifically to women. It is a simple wooden rectangle with a piece of wire mesh or a thin dowel inserted horizontally.
The Build:
Build a simple picture frame out of 1×2 pine. Instead of glass, staple chicken wire or hardware cloth to the back. The customer then hangs their earrings through the wire holes.
Why it works:
It is a solution to a problem (lost earrings) and looks beautiful on a vanity.
- Wooden Plant Stands
The “Plant Parent” trend is not going away. Simple plant stands are one of the easiest projects that sell at craft fairs because you can make them with just a few pieces of dowel and a miter saw.
The Build:
- A simple “tripod” style stand (three angled legs connected by string or a ring).
- A “stepped” plant stand that holds three different pots at different heights.
The Aesthetic:
Leaving these with a natural Danish oil finish highlights the grain. They look expensive but cost pennies in materials.
- The “First Date” Cutting Board
A smaller variation of the cutting board, but specifically designed to hold a bottle of wine and two glasses.
The Build:
- Cut a board about 12 inches wide and 18 inches long.
- Route a hole in the back to hold the wine bottle upside down.
- Add a small shelf or hooks in the front for wine glasses.
- Finish with a food-safe oil.
The Story:
This sells exceptionally well because you can sell it in a “Gift Set” with a bottle of wine (though check the liquor laws in your state first!). Even without the wine, it is a fantastic wedding or housewarming gift.
Section 4: The “Scrap Wood” Money Makers (Zero Waste)
Woodworking produces a lot of scrap. Instead of burning it or throwing it away, turn it into profit.
- Wooden Coasters
Cut your scrap pieces into 4×4 or 3×3 squares. Round over the edges.
The Bundle:
Sell them in sets of four tied with twine. You can include a small bottle of mineral oil with the purchase.
- Tea Light Holders
Drill a 1.5-inch hole in a block of scrap wood. This takes 5 seconds on a drill press. Add a small felt pad on the bottom.
The Detail:
Use different wood species (Walnut, Cherry, Maple) to show off the contrast. A set of three at different heights makes a great centerpiece.
- Garlic Roasters
This is a niche idea. Take a square block of wood and route a deep circle in the center. Place a small terracotta pot upside down in the hole. When you put a head of garlic in the pot and roast it, the wood acts as a heat shield.
The Appeal:
It sounds complex, but it’s just a hole in a block of wood. It sells incredibly well to foodies.
Section 5: The Art of Pricing (Don’t Sell Yourself Short)
One of the biggest mistakes new craft fair vendors make is pricing too low. You are selling “handmade,” not “factory direct.”
The Formula:
A good rule of thumb is:
(Cost of Materials x 3) + (Hourly Wage x Hours Worked) = Wholesale Price. Multiply that by 2 for the Retail Price.
However, craft fairs have a “sweet spot.”
- Under $20: These are “impulse buys.” Coasters, tea light holders, and small ornaments should be here.
- $20 – $50: Gifts and accessories. Cutting boards, wall-mounted openers, and signs fall here.
- $50 – $100: Home decor and larger items. Porch leaners and large bowls.
- $100+: Statement pieces. If you have a handcrafted table, that goes here.
The Psychology of Odd Numbers:
Price things at $19.99 instead of $20. It sounds significantly cheaper.
Section 6: Finishing Secrets That Seal the Deal
You can build the best item in the world, but if the finish is sticky, rough, or dull, it won’t sell. Here is the “pro” guide to finishing your woodworking projects.

- The “Glass” Finish (For Non-Food Items)
For signs and shelves, a wipe-on polyurethane or a spray-on lacquer gives a smooth, “glass-like” finish. It makes the wood look deep and expensive.
The Trick: Sand between coats with a high grit (320) and use a tack cloth to remove dust.
- The “Vintage” Look
Distressing is popular. Use a wire brush to grain the wood, or use a rubber mallet and a chain to ding up the edges before staining. When you stain over dents, they get dark and look like natural wear.
- Food Safe Finishes
For cutting boards, never use polyurethane or shellac. Use mineral oil, beeswax, or a blend specifically designed for cutting boards.
Pro Tip: Bring a small jar of your finishing wax to the fair. Tell customers, “When this board looks dry, apply this wax, and it will last a lifetime.” You can sell the wax for an additional $5.
Section 7: Display and Booth Setup
Even the best easy woodworking projects that sell at craft fairs will flop if they are laid flat on a table.
Vertical Thinking:
Stand your cutting boards up in a wooden crate. Lean your signs against stacked boxes. Use wooden crates and step risers to create varying heights. When customers walk by, they should see the items at eye level.
Lighting:
Buy battery-operated puck lights. Light up the merchandise. Wood absorbs light, so if your booth is dark, your pieces look dark. Illuminate them to show off the grain.
Scents:
This is a secret weapon. Have a small dish of sawdust from the wood you use (like cedar) on your table. The smell draws people in.
Section 8: Marketing and The “Upsell”
When a customer picks up a cutting board, don’t just hand it to them. Tell them a story.
- The Story: “This board is made from Walnut harvested in Ohio. I glued it up last Tuesday and sanded it through 8 grits to make it smooth.”
- The Build: This creates connection. People buy stories, not products.
The Upsell:
- If they buy the cutting board, offer the finishing wax.
- If they buy the sign, offer the hanging hardware.
- Offer a “Bundle Deal”: Get the Wine Caddy and the Cheese Board for $75 (normally $85).
Conclusion: Start Small, Learn Fast
The world of craft fairs is exhilarating. It is a direct feedback loop. If you bring something that people like, they will buy it. If they don’t, you learn and adjust.
The key takeaway is that you don’t have to build a grandfather clock to make money. Focus on the items that are functional, beautiful, and easily reproducible. The woodworking projects that sell best at craft fairs are the ones that solve a problem or spark joy in a customer’s life.
So, fire up the table saw, buy some rough lumber, and start building. The first few fairs might be a learning curve, but with the right inventory and a smile, you will be replacing your weekend income in no time.
Additional Bonus Tips for Success
-
- Business Cards: Always have business cards. You want the customer who can’t decide to find you online later.
- Take Credit Cards: Use a service like Square or PayPal Here. If you take cash only, you will lose 60% of your sales.
- The “Sandwich” Board: Bring a small, unfinished version of a project and a finished version. It shows the customer the transformation and justifies the price.