
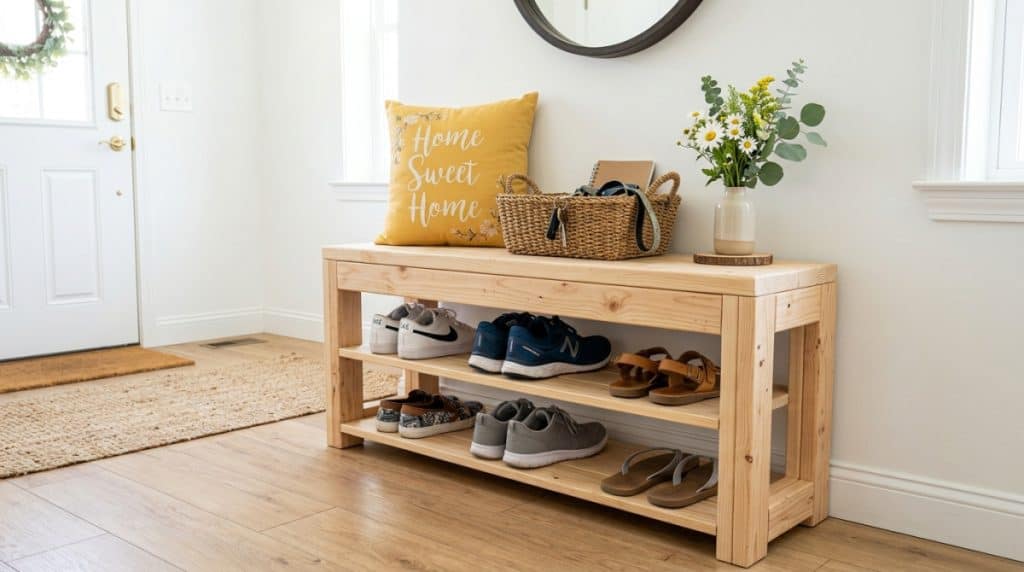
Tired of tripping over a mountain of shoes by the front door? Looking for a weekend project that’s actually useful, looks great, and won’t break the bank? You’ve come to the right place. I recently built the simplest, most sturdy shoe rack imaginable, and I’m going to show you exactly how to do it.
The best part? This isn’t just a flimsy rack. It’s built from standard 2×4 studs, making it incredibly strong. It’s so sturdy, in fact, that it doubles perfectly as a bench to sit on while you put on your shoes. Let’s get building!
This shoe rack is just the beginning—CLICK HERE to discover more woodworking project ideas.
Why This Shoe Rack is a Winner
Before I dive into the instructions, here’s why this is the ultimate DIY shoe rack:
- Incredibly Sturdy: Made from 2x4s, it’s built to last. No wobbling or collapsing under the weight of your heavy boots.
- Dual Function: Use it as a rack for storage and a bench for convenience. It’s a space-saving powerhouse.
- Cheap & Accessible: All materials are available at any local home improvement store for around $25.
- Beginner-Friendly: The design is straightforward. If you can use a drill and a saw, you can build this.
- Customizable: You can easily adjust the dimensions to fit your space or stain/paint it to match your decor.
What You’ll Need
The beauty of this project is its simplicity. Here’s the exact shopping list and tools required.
Materials (2×4 Lumber)
Based on the video, here is the cut list you’ll need. Remember, you can buy slightly longer boards and cut them down, or ask the store to make these cuts for you.
| Quantity | Length | Purpose |
| 9 | 3 ft | Shelves & supports |
| 4 | 2 ft | Legs/ends |
| 6 | 1 ft | Shelf dividers/supports |
- Note: These are the dimensions used in the video. You can adjust these lengths to make a wider or taller rack to fit your specific needs.
Tools
- Miter Saw: For making precise, clean cuts. A circular saw or even a hand saw will also work.
- Power Drill: Essential for driving screws.
- Orbit Sander: To smooth out any rough edges and make it safe to sit on (optional but highly recommended).
- Measuring Tape and Pencil: For marking your cuts.
Fasteners
- Pocket Screws: These are the star of the show, creating incredibly strong, hidden joints. You’ll need a pocket hole jig (like a Kreg Jig) to make the holes. If you don’t have one, you can use standard wood screws and wood glue, but pocket screws will give you the strongest and most professional-looking result.

Step-by-Step Building Guide
The video walks you through the process perfectly. But here’s a quick breakdown of the steps involved.
- Prep Your Lumber: Measure and cut your 2x4s according to the list above. Be precise with your measurements for the best fit.
- Drill Pocket Holes: Using your pocket hole jig, drill holes into the ends of the boards that will be joined to other pieces. The video shows exactly where to place these.
- Assemble the Sides: Start by constructing the two end frames of the shoe rack. Each side will be made by connecting the 2ft legs with the 1ft supports using pocket screws.
- Connect the Sides: Once your two end frames are built, join them together using the 3ft long 2x4s. These will act as the main shelves. Attach them to the frame at different heights to create space for your shoes.
- Sand and Finish: This is where you can make it look fantastic. Use your sander to smooth out all surfaces, especially the top, so it’s comfortable to sit on. Then, stain or paint it in a color that matches your home.
“Turn your next piece of scrap wood into something useful—find more project ideas with Ted’s Woodworking.”
Pro-Tips for a Perfect Build
- Wood Choice: Select straight 2x4s. Look down the length of the board to ensure it isn’t warped or bowed. This will make assembly much easier.
- Pre-drill: Even when using pocket screws, pre-drilling can help prevent the wood from splitting.
- Level Check: Use a level at each stage of assembly to ensure your rack is flat and won’t wobble.
- Get Creative: This is a base design. You can easily add a second shelf tier, a back panel, or a cushion on top to make it a more comfortable seat. You can also use different types of wood, like pine or oak, for a different look.
The Verdict
This DIY shoe rack is a fantastic project that solves a real problem with a simple, elegant solution. For less than the cost of a cheap store-bought rack, you can build something that is more durable, customizable, and functional. The added bonus of using it as a bench makes it a welcome addition to any mudroom or entryway.
So, grab your tools, head to the store, and build the shoe rack you’ve been needing. It’s an easy, satisfying project that will make you proud every time you sit down to put on your shoes. Happy building!
Ready for your next woodworking project? CLICK HERE to explore Ted’s Woodworking plans.