
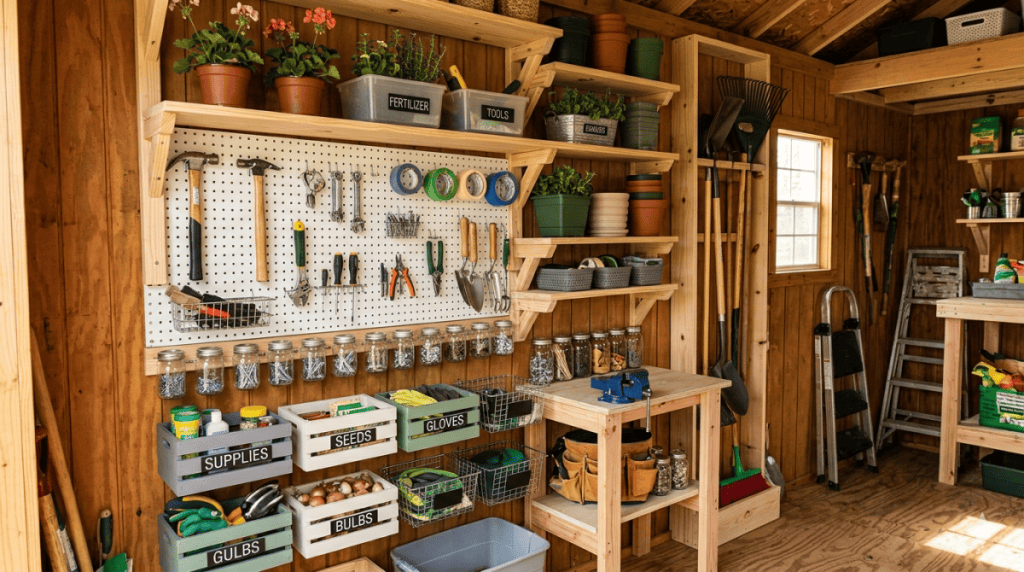
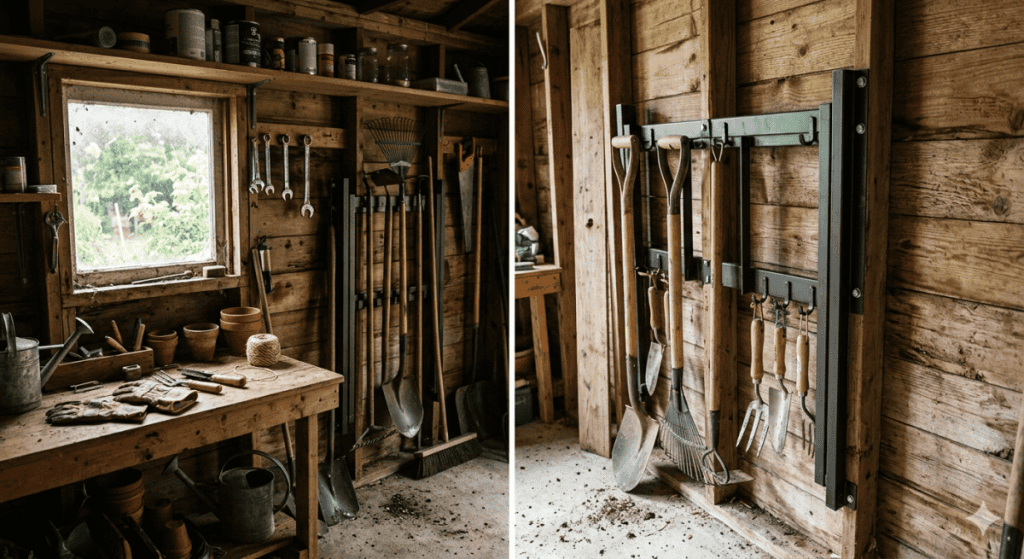
If you have ever opened the door to your garden shed only to be greeted by an avalanche of rakes, tangled hoses, and overturned fertilizer bags, you know the unique frustration of a small space. The floor vanishes quickly. A lawnmower eats up five square feet; a wheelbarrow takes another three. Suddenly, you are left with a narrow aisle where you must turn sideways just to grab a shovel.
The solution is not a bigger shed. The solution is looking up. Vertical storage is the single most effective strategy for reclaiming order in a cramped outbuilding. By utilizing your walls, rafters, and even the back of the door, you can double or triple your storage capacity without adding a single square foot to the foundation.

This guide will walk you through five detailed DIY vertical storage projects. Each section includes a full “how-to” guide, materials lists, tool requirements, and professional tips to ensure your shed becomes a model of efficiency.
The Philosophy of Vertical Storage (Before You Drill)
Before you grab a hammer, you need to assess your shed’s anatomy. Most small sheds are built with studs spaced 16 or 24 inches apart. You must anchor your storage into these studs. Drywall or thin plywood sheathing alone will not hold the weight of a loaded shelf.
The Golden Rules:
-
Weight distribution: Heaviest items (tool chests, jugs of oil) go at the bottom. Light items (empty pots, pool noodles) go near the ceiling.
-
Access frequency: Daily-use items (hand trowel, pruners) go at eye level. Seasonal items (Christmas lights, snow shovel) go high up.
-
Airflow: Leave gaps between your storage and the wall to prevent moisture buildup and mold.
Now, let’s build.

5 DIY Vertical Storage Ideas for Small Shed Interiors
Quick Navigation Menu
Idea #1: The “French Cleat” Modular Tool Wall
Idea #2: The Overhead “Lumber Loft” (Rafter Storage)
Idea #3: The “Drop Zone” Door Rack
Idea #4: The “Pegboard for Giants” (Slatwall)
Idea #5: The “Folding Vertical Garden” (For Wet Gear)
The Finishing Touches (Lighting & Labeling)
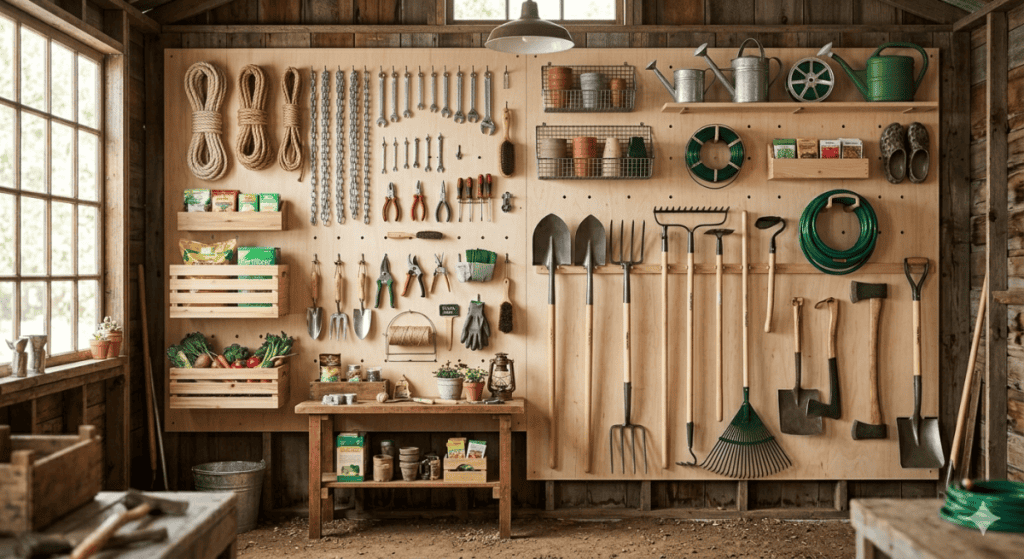
Idea #1: The “French Cleat” Modular Tool Wall
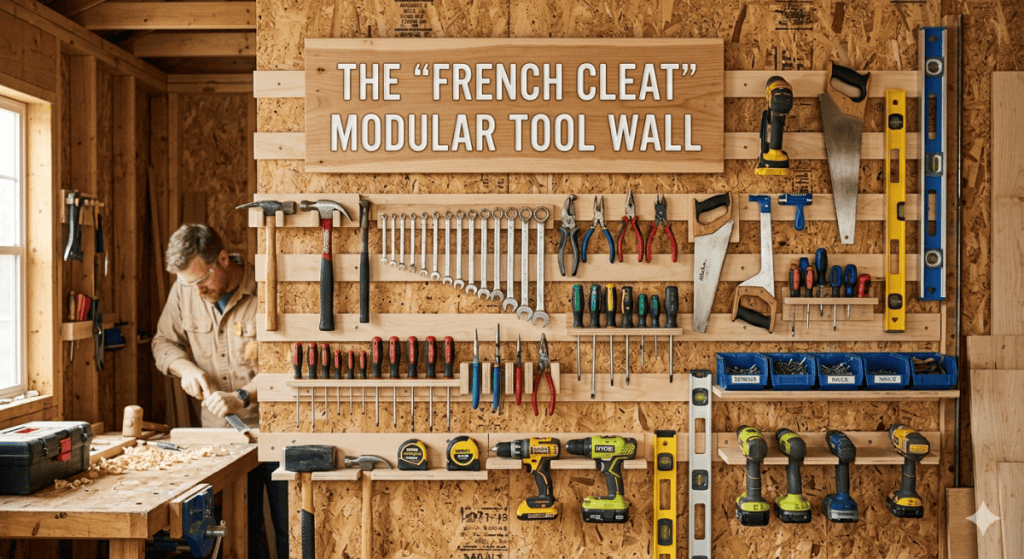
This is the gold standard for small shed organization. A French cleat system is a wooden rail that allows you to hang, remove, and reconfigure tool holders without finding a stud every time. It turns an entire wall into a giant pegboard, but much stronger.
Why it works for small sheds:
It utilizes the entire vertical plane. You can hang heavy shovels, power tools, and cluttered bins without the sagging you get from cheap pegboard.

Materials Needed:
-
1 sheet of ¾-inch plywood (Birch or Sande plywood is best; avoid OSB as it splinters)
-
Circular saw or table saw (to rip the plywood at a 45-degree angle)
-
Level (4-foot recommended)
-
Stud finder
-
3-inch wood screws (for attaching cleats to studs)
-
2-inch wood screws (for attaching tool holders)
-
Wood glue
-
Measuring tape
Step-by-Step DIY Instructions:
Step 1: Cut the Cleats
The “cleat” is a strip of wood with a 45-degree bevel. Cut your plywood into 4-inch wide strips along the 8-foot length. You will need enough strips to cover the width of your wall. For a typical 8×8 shed wall, aim for three horizontal rows of cleats.
Step 2: Rip the Bevel
Set your table saw blade to 45 degrees. Take each 4-inch strip and rip it directly down the middle. You will now have two types of strips:
-
Wall Cleat: The long edge has a 45-degree bevel pointing up.
-
Tool Cleat: The long edge has a 45-degree bevel pointing down.
Step 3: Mount the Wall Cleats
Using a level, mark a horizontal line on your wall where you want the first row of cleats (typically 24 inches off the floor). Hold the Wall Cleat so the bevel faces up and away from the wall. Screw it into every stud using 3-inch screws. Install subsequent rows 16 to 24 inches apart vertically.
Step 4: Build Your Tool Holders
Now you create the hanging components. Cut 6-inch squares from your remaining plywood. On the back of these squares, glue and screw a piece of the Tool Cleat (bevel facing down). This square will now slide snugly onto the wall cleats.
Step 5: Customize the Holders
-
For shovels/rakes: Cut a slot in the front of the square using a jigsaw.
-
For screwdrivers: Drill angled holes into a 2×4 block, then mount the block to the square.
-
For extension cords: Glue a PVC pipe coupling to the square.
Pro Tip: Paint the back of the wall cleats a dark color and the tool holders a bright color. The contrast makes it easy to see where you need to put things back.
Idea #2: The Overhead “Lumber Loft” (Rafter Storage)
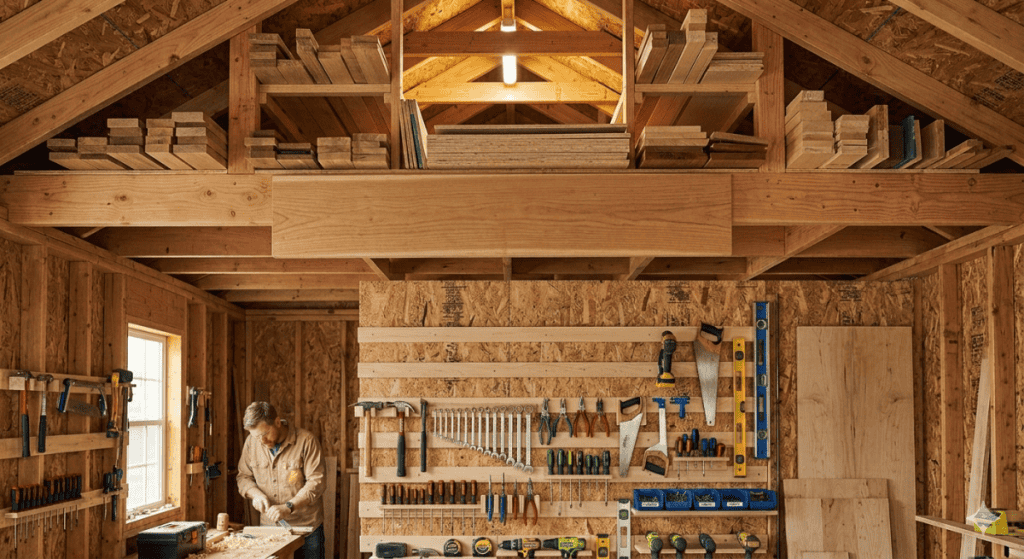
Most small sheds have wasted triangular space between the top of the wall and the roof peak. This space is ideal for storing long, light-to-medium weight items like spare lumber, PVC pipes, gutter sections, or folding chairs.
Critical Safety Warning:
Do not overload your shed roof rafters. Shed roofs are designed for snow and wind, not heavy storage. Keep the total weight under 50 pounds per rafter bay.
Materials Needed:
-
2×4 lumber (treated for moisture resistance, though interior shed is usually dry)
-
¾-inch plywood or OSB for the decking
-
Lag bolts (¼-inch x 4-inch)
-
Heavy-duty L-brackets (3-inch x 3-inch)
-
Circular saw
-
Wrench and socket set
Step-by-Step DIY Instructions:
Step 1: Assess Your Rafter Span
Look at your shed ceiling. If you have trusses (metal connector plates), only store items directly above the walls. If you have rafters (angled beams meeting at a ridge board), you can build a platform. Measure the distance between two rafters. Standard spacing is 24 inches.
Step 2: Cut the Cross Beams
You need to create a “ladder” across the bottom chords of the rafters (the horizontal ceiling joists). Cut 2x4s to the length of your desired loft depth. A 24-inch deep loft is sufficient for lumber. You will need one 2×4 for every 24 inches of width.

Step 3: Install the Ledger Boards
Cut two 2x4s to run the full length of the wall. These are your ledger boards. Screw them directly into the wall studs (not the sheathing) using lag bolts. The top edge of the ledger board should be exactly flush with the top edge of the ceiling joists. This creates a solid shelf “lip.”
Step 4: Secure the Cross Beams
Take your cross beam 2x4s and lay them perpendicular to the rafters. Rest one end on the ledger board and the other end on top of the ceiling joist (or a second ledger board on the opposite wall). Screw through the cross beam into the ledger board with 3-inch screws. Use L-brackets underneath for additional support.
Step 5: Add the Decking
Cut your plywood into planks that fit between the rafters. Because rafters are angled, you will likely have to notch the plywood. Simply trace the angle of the roof onto the plywood and cut with a jigsaw. Screw the plywood down to the cross beams.
What to store here: Seasonal decorations, empty plastic planters, rolled-up tarps, and lightweight coolers. Never store paint, bags of concrete, or heavy power tools up here.
Idea #3: The “Drop Zone” Door Rack
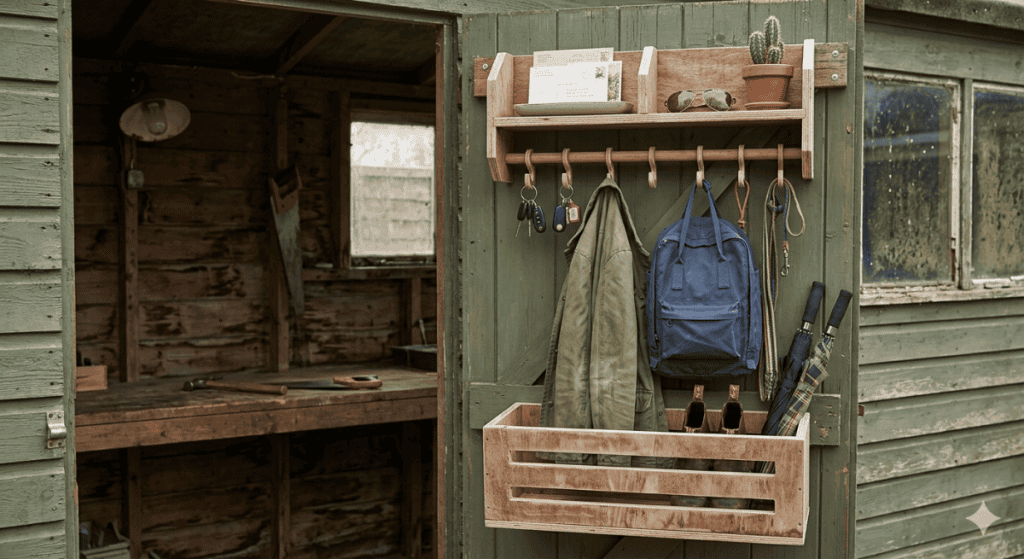
The back of the shed door is the most underutilized real estate in the entire structure. It is accessible, shallow, and perfect for small, frequently used hand tools. Unlike walls, doors move, so you need a secure, low-profile solution.
Materials Needed:
-
1 sheet of ½-inch plywood (cut to the size of your door panel)
-
1×2 furring strips (for creating “cubbies”)
-
Over-the-door hook rack (metal) OR heavy-duty adhesive hooks
-
Wood screws (1 inch)
-
2-inch screws for attaching plywood to the door (make sure they don’t poke through the other side!)
-
Drill with countersink bit
-
Sandpaper
Step-by-Step DIY Instructions:
Step 1: Measure and Cut the Backing Board
Remove the door hinges (you will need a helper). Lay the door flat on sawhorses. Measure the recessed panel of the door—usually the flat area between the vertical stiles. Cut your plywood to fit exactly inside this recess. Sand all edges smooth.
Step 2: Attach the Backing Board
Place the plywood onto the door. Drill pilot holes through the plywood and into the door’s solid frame (the stiles and rails). Use 1-inch screws to avoid puncturing the exterior side. Countersink the screws so the heads are flush.
Step 3: Build the Organizer Grid
Using your 1×2 furring strips, create a grid on the plywood. Cut vertical strips first (every 6 inches) and screw them to the plywood. Then cut horizontal strips (every 4 inches) to create small cubbies. The bottom cubbies can be larger (8 inches tall) for gloves and small spray bottles. The top cubbies can be small (2 inches tall) for seed packets and markers.

Step 4: Install Hanging Hardware
On the lower half of the door, install an over-the-door hook rack (you may need to trim the hooks to fit the door thickness). Alternatively, screw in 3-inch metal hooks directly through the plywood and into the door stiles. These are perfect for hanging aprons, brooms, or a leaf blower.
Step 5: Add Magnet Strips
For a professional touch, screw a 12-inch magnetic tool strip horizontally across the upper part of the door. This will hold your pruners, trowels, and even a small level. The “snap” of the magnet keeps tools secure even when the door slams.
Pro Tip: Install a clear plastic shoe organizer on the inside of the door instead of building cubbies. It is a $10 hack that holds 24 small items like caulk tubes, WD-40, and gloves.
Idea #4: The “Pegboard for Giants” (Slatwall)
Pegboard is classic, but standard ¼-inch pegboard sags under garden tools. You need a Slatwall. This is a grooved panel system used in retail stores. It is incredibly strong and allows you to move brackets without drilling new holes every time.
Materials Needed:
-
4×8 foot sheet of MDF Slatwall (available at big box hardware stores) OR DIY using 1×2 slats
-
If DIY: ¾-inch plywood and 1×2 poplar strips
-
Slatwall hooks and baskets (purchased online)
-
Construction adhesive (Liquid Nails)
-
2-inch screws
-
Circular saw (with a guide track for straight cuts)
Step-by-Step DIY Instructions (DIY Slatwall Version):
Step 1: Cut the Backer Board
Cut a 4×4 or 4×8 sheet of ¾-inch plywood to fit your chosen wall section. Since we are working in a small shed, you might only need a 4×4 foot section near the workbench.
Step 2: Cut the Slats
Rip your 1×2 poplar strips to exactly 1.5 inches wide. You need enough strips to cover the plywood vertically or horizontally. Horizontal slats are better for holding long handles (rakes, hoes). Vertical slats are better for adjustable shelving.

Step 3: Create the “T” Groove
This is the tricky part. A Slatwall works because the hook inserts into a gap and then drops down behind the slat. To replicate this, you need to create a ¼-inch gap between your slats.
-
Lay a strip of 1×2 flat on the plywood.
-
Place a ¼-inch thick spacer (a piece of cardboard or a washer stack) next to it.
-
Lay the next 1×2 strip.
-
Glue and screw the 1×2 strips through the spacer into the plywood.
-
Remove the spacer. You now have a ¼-inch groove that is ½-inch deep.
Step 4: Install the Wall
Screw the completed Slatwall panel directly into the shed studs using 2-inch screws. Ensure it is level.
Step 5: Insert the Brackets
Purchase standard Slatwall hooks (they look like a bent “L”). Insert the metal tab into the ¼-inch groove, then pull the hook down. The hook will lock behind the 1×2 strip. These brackets can hold 50+ pounds each.
Best use: Hang your heavy tool bag, the weed whacker, and even a small vice for your workbench. You can also buy Slatwall bins to hold screws and bolts.
Idea #5: The “Folding Vertical Garden” (For Wet Gear)
If your shed smells like damp soil and muddy boots, you need a drying solution that doesn’t take up floor space. This is a folding vertical rack that mounts to the exterior wall inside the shed.
Materials Needed:
-
2×6 lumber (treated)
-
4 heavy-duty strap hinges (3-inch)
-
2 gate hooks with eyelets
-
Wood glue
-
2-inch deck screws
-
1-inch dowel rods (cut into 6-inch lengths)
Step-by-Step DIY Instructions:
Step 1: Build the Frame
Cut two 2×6 boards to 48 inches tall (the uprights). Cut two 2×6 boards to 18 inches wide (the crossbars). Assemble a rectangle: screw the crossbars between the uprights at the top and bottom. This creates a “ladder” shape.
Step 2: Add the Dowel Pegs
Drill 1-inch diameter holes, 1.5 inches deep, into the front face of the uprights. Space the holes every 4 inches vertically. Apply wood glue into the holes and tap in the 6-inch dowel rods. Let the glue dry. These dowels act as arms to hold boots, hoses, or watering cans.
Step 3: Attach the Hinges
Screw the strap hinges to the left side of the 2×6 frame. Then, screw the other side of the hinges directly into a wall stud. The frame should now swing open like a door.
Step 4: Install the Locking Mechanism
When you swing the rack away from the wall, it needs to stay put. Install a gate hook (a metal loop) on the right side of the frame. Install the eyelet screw into the wall stud 48 inches high. When you swing the rack out, drop the hook into the eyelet to hold it steady.

Step 5: Use the System
-
Swing against wall (storage mode): The dowels poke out. Hang watering nozzles, coiled hoses, or kids’ rain boots on the dowels.
-
Swing away from wall (drying mode): Pull the rack out 90 degrees. You now have a “porch” inside your shed. Place muddy boots upside down on the dowels so they drip into a shallow oil pan on the floor.
Why this is genius: Wet gear stored flat against a wall will grow mold. This rack creates air circulation around the gear without sacrificing your walking space.
The Finishing Touches (Lighting & Labeling)
Vertical storage is useless if you can’t see it. Most small sheds have a single, dim bulb in the center. When you stack shelves to the ceiling, the top shelves become black holes.
Install LED Strip Lighting:
Buy a 16-foot roll of LED sticky-back light strips (battery powered or plug-in). Run the strip vertically along the corners of your walls. Because LEDs are flat, they don’t take up storage space. The light will travel up the wall, illuminating every shelf and hook. For a shed without power, use rechargeable motion-sensor puck lights stuck to the ceiling.
The Labeling System:
Because vertical storage relies on stacking, you will inevitably forget what is behind the box of Christmas lights. Invest in a $10 label maker. Label every bin, shelf edge, and hook.
-
Rule: “A place for everything, and everything in its place.”
-
Color code: Red labels for lawn & garden. Blue labels for auto supplies. Yellow for painting.
The “One Year” Box:
Before you install any of these systems, take everything out of your shed. Create a box labeled “One Year.” Put any item you haven’t used in 12 months into this box. If you build your new vertical racks and still have room, you can keep the box. If not, donate it. You will be shocked at how much junk you store vertically.
Conclusion: Reclaiming Your Footprint
A small shed does not have to be a cluttered prison. By moving your storage off the floor and onto the walls, rafters, and doors, you fundamentally change the geometry of the space. The French cleat system turns tools into art. The overhead loft steals nothing but air. The door rack catches the small items that usually get lost in buckets.
Pick one project this weekend. Do not try to do all five at once. Start with the French cleat wall. It is the most forgiving and rewarding. Once you hang that first shovel on a custom wooden hook and see that you can now walk past it without tripping, you will be hooked. Your shed will stop being a place you dread opening and start being the workshop, garden headquarters, or quiet retreat it was always meant to be.
Look up. The space is waiting.