
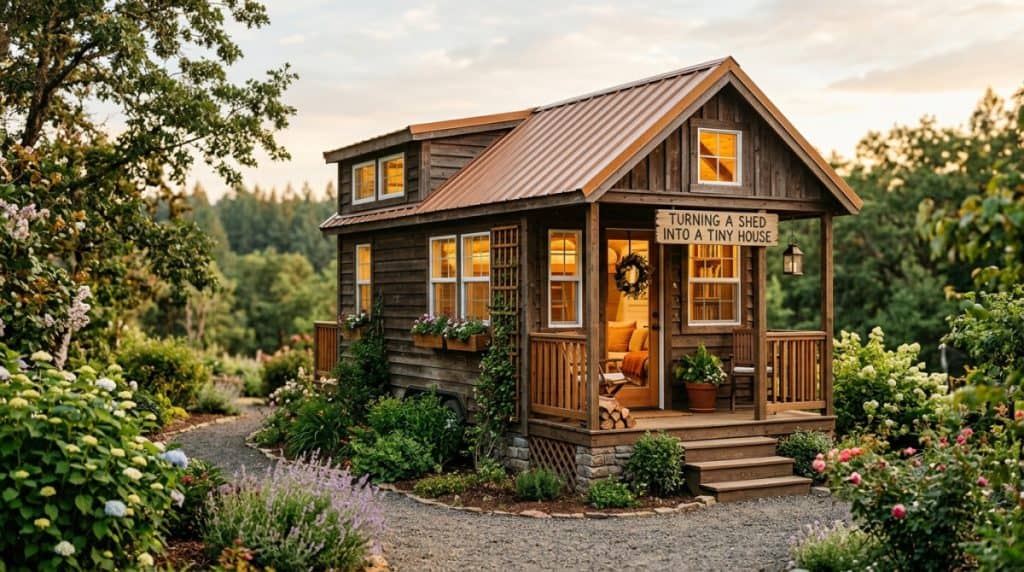
There is a certain romance to the idea of a tiny house. It conjures images of minimalist living, financial freedom, and a smaller carbon footprint. However, for many, the cost of a custom-built tiny home on wheels or a prefab unit can still be prohibitively expensive, often ranging from $30,000 to over $100,000.
Enter the humble garden shed.
For a fraction of the cost of a traditional tiny house, a prefabricated shed can be transformed into a stunning, livable dwelling. This isn’t just a trend; it is a revolution in affordable housing. We are seeing a massive shift away from “keeping up with the Joneses” and a move toward “keeping it simple.” Turning a shed into a tiny house is the perfect middle ground between extreme DIY (building from scratch) and the expensive purchase of a turn-key tiny home.
But it is not as simple as putting a bed in a tool shed and calling it a day. To create a safe, comfortable, and legal living space, you need a plan. Whether you envision a rustic weekend getaway in the woods or a permanent urban dwelling in your backyard, this guide will walk you through the 10 critical steps to transform a basic wooden box into a cozy haven.
10 Tips for Turning Your Shed into a Tiny House
Quick Navigation Menu
1. The Legal Maze: Zoning, Permits, and Building Codes
2. Choosing the Right Shed: The Foundation of Your Build
3. The Subfloor: The Unsung Hero of Comfort
4. Building the Interior Walls: Creating Rooms
5. Insulation: The Engine of Tiny House Efficiency
6. Sheathing and Waterproofing: Keeping the Wet Out
7. The “Wet Room”: Plumbing and Water Systems
8. Interior Design: Maximizing a Small Footprint
9. Heating, Cooling, and Power
10. The Finishing Touches: Making It a Home
The Budget: How Much Will It Cost?
Conclusion: Is a Shed Tiny House Right for You?
Related Reading
Tiny House Plans: 15 Amazing Designs You’ll Wish You Found Sooner
1. The Legal Maze: Zoning, Permits, and Building Codes
Before you buy a single 2×4, you must deal with the boring—but essential—subject of the law. The number one mistake DIY renovators make is assuming they can just build it. Converting a shed into a living space means you are changing the classification of the structure from “accessory building” to “dwelling unit.” This triggers a cascade of legal requirements.
Zoning Laws:
Zoning dictates what you can do with your property. If you are in a residential zone, you must check if “Accessory Dwelling Units” (ADUs) are allowed. Many cities are relaxing ADU regulations to combat the housing crisis, but others still have strict minimum square footage requirements that a shed might not meet.
Building Permits:
In most jurisdictions, you will need a building permit for this conversion. This is not a suggestion; it is a necessity for safety and insurance. The permit process ensures your structure meets safety standards regarding structural integrity, fire resistance, and egress (emergency exits).

International Residential Code (IRC):
Tiny houses are generally governed by Appendix Q of the IRC, which outlines the specific requirements for homes under 400 square feet. Key requirements include:
-
Minimum Ceiling Height: Usually at least 6 feet 8 inches.
-
Loft Egress: If you have a sleeping loft, it likely needs a window that is at least 5.7 square feet and no more than 44 inches from the floor for escape.
-
Stairs: “Ladder” stairs are often prohibited; you may need real stairs with specific tread depth and riser height.
Pro Tip: Walk into your local building department with a plan, not a question. Say, “I am looking to convert a shed into an ADU and need to know what specific codes I need to follow.” They will respect your preparedness and are more likely to help you navigate the process.
If you are building a tiny shed home in a remote area, a trip to the grocery store isn’t always convenient. Smart tiny homeowners keep a 30-day supply of non-perishable food on hand. Grab a 3-month emergency food supply here.
Related Reading
Do You Require a Building Permit For a Storage Shed?
Can I Build a Shed Without Getting a Permit?
What’s the Maximum Shed Size Without Permit?
Do I Need a Permit to Wire a Shed?
2. Choosing the Right Shed: The Foundation of Your Build
Not all sheds are created equal. If you buy a flimsy $500 kit from a big-box store, you will spend more time (and money) trying to reinforce it than you would have spent on a better structure. You need a “shell” that is ready for insulation and finishing.
Pre-built vs. Kit vs. Custom:
-
Pre-built: Delivered on a truck. These are usually the strongest because they are built as a single unit.
-
Kits: Cheaper but require extensive assembly. Ensure the lumber is “kiln-dried” to prevent warping.
-
Custom Build: Hiring a carpenter to build a shell on-site gives you the most flexibility regarding window placement and size.
Critical Shed Attributes to Look For:
-
Floor Joists: Look for 2×6 floor joists (or larger) on 16-inch centers. This is crucial for supporting the weight of furniture and people.
-
Wall Framing: 2×4 framing is standard, but 2×6 is better if you plan on living in a cold climate. The extra width allows for more insulation (R-19 vs. R-13).
-
Roof Pitch: A steeper pitch is aesthetically pleasing and allows for a loft sleeping area. It also helps snow shed off in winter.
-
Height: You need as much interior height as possible to fit a loft and stand up comfortably. Look for sheds with 8-foot walls or higher.
-
Windows and Doors: If the shed doesn’t have windows, you will need to cut them in. This is doable, but it’s easier to order them pre-installed. Ensure the door is a standard 36-inch “pre-hung” door for easy entry.
Related Reading
Choosing the Right Shed Size for Your Yard Size
Where Can I Build a Shed on My Property
Are She Shed Kits a Good Option?
How to Choose the Best 8 x 10 Shed
How Do I Determine the Best Size Shed?
3. The Subfloor: The Unsung Hero of Comfort
Once the shed arrives, your first job is to ensure it is level. An unlevel floor will make doors stick and furniture wobble. Use shims or a gravel base to get it perfectly level.
Insulating the Floor:
A cold floor is the number one complaint in tiny houses. If you have a wood floor sitting on a foundation, you need to insulate it.
-
Option A: Underneath: If you have access underneath (crawl space), staple fiberglass insulation between the joists and cover it with a vapor barrier.
-
Option B: On Top: If you can’t access the bottom, you must build a “floating floor” on the inside. Lay down rigid foam insulation (XPS) directly onto the subfloor, then cover it with a layer of 3/4-inch OSB or plywood, and finally your finish flooring (luxury vinyl plank works great for moisture resistance).
Related Reading
How Do I Strengthen My Shed Floor?
How Do You Build a Floor in an Existing Shed?
What is the Best Type of Flooring for a Shed?
4. Building the Interior Walls: Creating Rooms
A 120-square-foot shed is tiny. A 200-square-foot shed is spacious but still limited. How you lay out the interior walls will define the flow of the space.
The Three-Zone Method:
In tiny house design, you rarely build “full walls” from floor to ceiling because that makes the space feel claustrophobic. Instead, you build “half walls” or “pony walls.”
-
The Bathroom Pod: This is usually a closed-off box because you need privacy for the toilet and shower.
-
The Sleeping Loft: You don’t need walls around the bed if it is in the loft; you use railing.
-
The Kitchen Divider: A 4-foot-tall wall to separate the kitchen from the living room creates division without cutting off light.
Wiring Considerations:
This is the time to run your electrical wires. You will need to decide where outlets go. Building code requires outlets every 12 feet along the walls and GFCI outlets near water sources (kitchen and bath). Hire a licensed electrician for the “tie-in” to your main panel; doing it wrong can start a fire or fail a home inspection.
5. Insulation: The Engine of Tiny House Efficiency
One of the biggest reasons to convert a shed is the low cost of utilities. A well-insulated shed can be heated with a space heater for pennies a day. A poorly insulated shed will be freezing in winter and boiling in summer.
Types of Insulation:
-
Fiberglass Batts: The cheapest and easiest DIY option. However, cutting it around electrical boxes is tedious, and you MUST leave a gap for airflow near the roof soffits.
-
Rigid Foam Board: Excellent for walls and floors. It provides a vapor barrier and high R-value per inch, but it is expensive and requires precise cutting.
-
Spray Foam: The gold standard. It fills every crack and gap, acts as a vapor barrier, and makes the structure incredibly rigid. It costs more upfront but pays for itself in energy savings.
The 6-Mil Poly Barrier:
If you use fiberglass, you must staple a 6-mil polyethylene vapor barrier over the studs before you drywall. This stops moisture from inside the house (cooking, showering) from seeping into the walls and rotting the wood.

6. Sheathing and Waterproofing: Keeping the Wet Out
The plywood shell of a shed is not waterproof—it’s water-resistant. You need to add a protective layer.
The Roof:
Shed roofs often come with basic felt paper. This is inadequate for a tiny house. You should install “Ice and Water Shield” (a peel-and-stick rubberized membrane) on the lower edges of the roof to prevent ice damming. Then, cover the entire roof with metal roofing or architectural shingles. Metal roofing is highly recommended for tiny houses because it lasts 50 years and sheds snow and rain quickly.
The Siding:
If your shed has wooden siding, it needs to be painted or stained to seal the wood. Better yet, consider installing “HardiPlank” fiber cement siding or another weather-resistant exterior cladding to increase longevity.
The “Rain Screen” Concept:
If you have the budget, create a “rain screen” by adding furring strips between the sheathing and the siding. This creates a 1/4-inch gap that allows water that gets behind the siding to dry out, preventing rot.
7. The “Wet Room”: Plumbing and Water Systems
Water is the most complicated aspect of tiny house living. There are three levels of plumbing you can install:
Level 1: No Plumbing (Off-Grid/Composting)
-
Toilet: Composting toilets dry out waste and turn it into soil. No water hookup needed.
-
Water: Use jugs of drinking water and a portable camping shower. This is great for a weekend cabin but not viable for full-time living.
Level 2: Gray Water Only
-
Sink and Shower: Water goes down the drain to a gray water tank or a leach field (where legal).
-
Toilet: Composting. This reduces the need for a septic system.
Level 3: Full Plumbing (The Hardest Route)
-
This requires connecting to your home’s water supply (or a well) and a septic system or municipal sewer.
-
PEX Tubing: Use PEX (cross-linked polyethylene) for plumbing lines. It is flexible, doesn’t burst if it freezes slightly, and is much easier to run through walls than copper.
-
The “Wet Wall”: Group all your water needs (bathroom sink, shower, kitchen sink) on the same wall. This concentrates all the plumbing into one “wet wall,” saving you space and reducing the length of pipes you need to run. If you are skipping a traditional well hookup to save money, you need a backup water source. Many off-grid shed owners are turning to atmospheric water generation to supply their kitchen sinks. Check out this blueprint for generating 60 gallons of water a day here.
8. Interior Design: Maximizing a Small Footprint
Now comes the fun part: making it look like a home.
The Loft: The Sleeping Solution
In a shed, a sleeping loft is almost mandatory to maximize space. However, lofts can be dangerous. Make sure you have a sturdy railing and a ladder that is comfortable to climb. A “ship ladder” (which has a slight angle) is far more comfortable than a vertical “library ladder.”
Built-in Furniture:
In a 200-square-foot home, you cannot afford to waste space on pieces of furniture that sit against the wall. Build in your furniture.
-
Murphy Bed: If you don’t want a loft, a wall bed is the best option.
-
Banquette Seating: Instead of a sofa, build a bench seat against the wall with storage underneath.
-
Elevated Furniture: Raise your bed or storage areas off the floor to utilize the space underneath for bins.
Color and Light:
-
Paint: White, off-white, or very light pastels. Dark colors make a tiny space feel like a cave.
-
Mirrors: A large mirror on the wall effectively doubles the visual space of the room.
-
Curtains: Install curtains at the very top of the walls (ceiling to floor) to draw the eye upward, creating the illusion of height.
9. Heating, Cooling, and Power
Heating:
-
Mini-Split Heat Pump: This is the holy grail for tiny houses. It cools in the summer and heats in the winter. It is efficient, quiet, and doesn’t require ductwork. However, it costs $1,000–$2,000.
-
Wood Stove: A tiny “cubic” wood stove adds ambiance but takes up floor space and requires a chimney.
-
Electric Baseboard: Cheap to install but expensive to run. Only advisable if you live in a mild climate.
Electrical Panel:
You need a sub-panel (breaker box) inside the shed. This connects to your main panel via a heavy-duty underground cable. Don’t just run an extension cord through the yard—this is a fire hazard.
Solar Power (Off-Grid):
If you are serious about living off-grid, install solar panels on the roof, a charge controller, and a battery bank. Since a shed is small, you can run it on a 12-volt DC system similar to an RV, avoiding the need for expensive inverters for the whole house.
Installing a commercial solar system can run you $10,000. However, if you are handy enough to build a shed, you are handy enough to build your own solar panels. Learn how to build your own solar array for under $200 here.
10. The Finishing Touches: Making It a Home
The final stage is the detail work. This is what separates a “renovated shed” from a “tiny house.”
Trim and Molding:
Adding baseboards and window casings instantly makes the interior look polished. It hides any imperfections where the drywall meets the floor.
Smart Storage:
-
Under-Stair Storage: Build drawers into the risers of your stairs/ladder.
-
Magnet Strips: Mount a magnetic knife strip on the kitchen wall instead of a bulky knife block.
-
Hooks: Lots and lots of hooks. Hang pots, pans, mugs, and coats to keep counters clear.
Exterior Aesthetics:
Don’t forget the outside! A simple deck or patio area extends your living space. Planter boxes with flowers, a pergola, or even string lights can turn a garden shed into a charming cottage.
The Budget: How Much Will It Cost?
Let’s talk numbers. While building from scratch can cost $20,000+, a shed conversion can be far cheaper.
-
Cost of a Good Shed: $3,000 – $6,000 (for a 12×16 size)
-
Insulation and Drywall: $1,500 – $2,500
-
Electrical and Lighting: $1,000 – $2,000 (depending on professional help)
-
Plumbing (Basic): $1,000 – $3,000
-
Interior Finishes (Flooring, Paint, Trim): $1,000 – $2,500
-
HVAC (Mini-Split): $1,000 – $2,000
Total Estimate: $8,500 – $18,000
This is significantly cheaper than the average tiny house on wheels. The cost variance depends entirely on how much DIY labor you perform. Sweat equity is the largest cost-saver.
Common Pitfalls to Avoid
-
Ignoring the “Heat Load”: If you place a big window on the south side of the shed, you will get passive solar heating in winter, but you will cook in summer. Plan your window placement for cross-ventilation.
-
Forgetting Headroom in the Loft: Sleeping in a loft with a 3-foot ceiling is claustrophobic. Ensure the loft has at least 4 feet of headroom at its highest point to sit up comfortably.
-
Inadequate Foundation: If you place the shed directly on dirt, it will rot within a few years. It must sit on concrete blocks, a concrete slab, or pressure-treated skids on gravel.
-
Underestimating the Time: A shed conversion takes 3-6 months of weekends. It is a hobby, not an overnight project.
Conclusion: Is a Shed Tiny House Right for You?
Turning a shed into a tiny house is the ultimate DIY project. It offers a path to homeownership that is accessible, sustainable, and incredibly rewarding. Standing back and looking at a structure that was once used to store lawnmowers, now transformed into a cozy living room with a steaming cup of coffee in hand, is a feeling like no other.
It is not a shortcut. It is hard work. It requires research, budgeting, and a willingness to learn new skills—from plumbing to drywall. But the payoff is massive: financial freedom from a mortgage, a reduced environmental impact, and the knowledge that you built your home with your own two hands.
So, start sketching, visit your local building department, and order that shed. Your tiny house journey starts now.
Your shed is now a home—but why stop there? Turn the exterior walls into a vertical food garden to slash your grocery bills. Learn how to build a DIY hydroponic system here.