
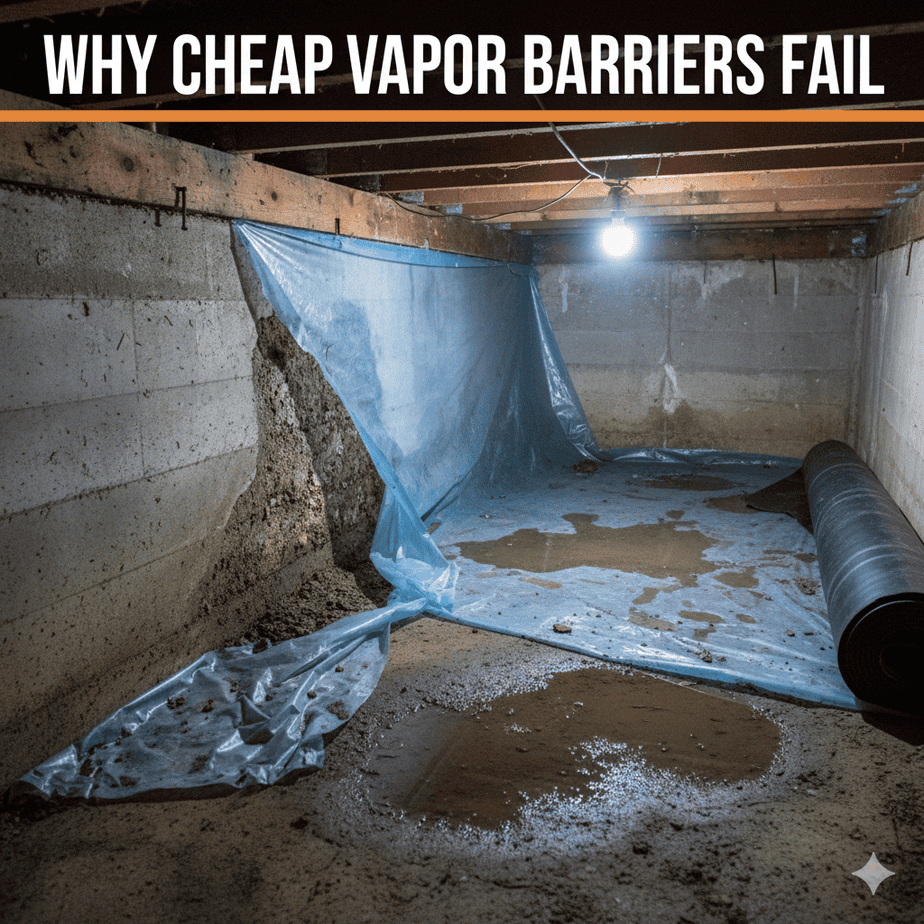
In the world of home and shed improvement, few things seem as straightforward as a vapor barrier. It looks like simple plastic sheeting, and it’s tempting to save a few dollars on the cheapest roll you can find. After all, how different can it be?
The truth is, the difference is profound. Opting for a cheap, inferior vapor barrier isn’t just a minor compromise; it’s one of the most common and costly mistakes a DIYer can make. While it might look fine the day you install it, its failure is often silent, hidden within your walls, leading to rot, mold, and structural damage that far outweighs any initial savings.
Understanding why these budget options fail is the key to making a smart investment that will protect your building for decades.

Quick Navigation Menu
The Four Fatal Flaws of Cheap Vapor Barriers
How to Pick a Vapor Barrier That Actually Lasts
Choose the Right Type for Your Climate and Project
Invest in the System: Buy the Right Tape
The Final Calculation: Cheap Now vs. Costly Later
The Four Fatal Flaws of Cheap Vapor Barriers
A vapor barrier’s job is simple in concept: to create a continuous, impermeable shield against moisture vapor. Cheap products fail at this fundamental task in several predictable ways.
1] The Peril of Thinness and Poor Durability
The most obvious differentiator is thickness, measured in “mils” (one-thousandth of an inch). A bargain-bin vapor barrier is often a flimsy 2-mil or 4-mil plastic.
Why It Fails: This thin film is incredibly susceptible to tearing during installation. A snag on a rough stud, an overdriven staple, or a simple misstep can easily puncture it. Furthermore, once the walls are closed up, the barrier is subject to pressure changes, minor shifting, and potential contact from pests. A thin barrier can develop micro-tears and punctures long after you’ve finished the project. Every tear is a gateway, funneling moisture-laden air directly into the very wall cavity you’re trying to protect, concentrating the problem and creating a perfect pocket for condensation.
Protect Your Shed Today — Shop the Best Vapor Barriers on Amazon!
2] The UV Degradation Trap
Many cheap poly sheets are not formulated for long-term building use. They are often repurposed agricultural or construction-grade plastics not designed to remain stable for the life of a structure.
Why It Fails: If this material is left exposed to sunlight for even a few weeks during construction, ultraviolet (UV) radiation breaks down the polymers. The plastic becomes brittle, losing its flexibility and strength. Once it becomes brittle, it can crack from temperature fluctuations or simple vibration. This degradation can begin long before the interior walls are installed, meaning you’re sealing up a barrier that is already compromised and destined to crumble.
3] The Impermeable Illusion (It’s Not Just About Plastic)
A crucial performance metric for a vapor barrier is its permeance, rated in perms. A true vapor barrier must be 0.1 perms or less. Some inexpensive materials, including certain types of house wrap misused as a barrier, have a higher permeance.
Why It Fails: If the material isn’t truly impermeable, it’s not a barrier; it’s a retarder. Over time, it will allow slow, steady moisture vapor to pass through it. In a cold climate, this means enough moisture can seep into the wall assembly to condense on the cold sheathing, leading to damp insulation, wood rot, and mold growth. You are lulled into a false sense of security by a product that looks the part but doesn’t perform the essential function.

4] The Taping Catastrophe
A vapor barrier is a system, and its weakest point is always the seams. The barrier itself is only as good as the tape used to seal it.
Why It Fails: Cheap plastic often comes with no tape recommendation, leading DIYers to use standard duct tape or masking tape. These tapes are not designed for this purpose. Their adhesive fails over time, especially when exposed to temperature extremes. They lose their bond, curl, and peel away, leaving gaps at every seam. A perfectly installed sheet of plastic is rendered useless by failed seams, creating a network of openings for vapor to enter.
How to Pick a Vapor Barrier That Actually Lasts
Selecting a quality vapor barrier isn’t complicated, but it requires looking beyond the price tag and focusing on specifications and intended use.
1] Prioritize Thickness and Strength: For a durable, dependable barrier, do not settle for anything less than 6-mil polyethylene. This is the accepted standard for a reason—it provides a baseline of durability that can survive a careful installation.
For a Superior, “Buy-It-For-Life” Solution: Upgrade to 10-mil or 15-mil cross-laminated polyethylene. This material is engineered with reinforced layers, making it extremely tear- and puncture-resistant. It feels substantial in your hands and inspires confidence during installation. The extra cost is a minor insurance policy compared to the cost of repairing rotten walls.
Seal Out Dampness — Find the Right Vapor Barrier for Your Shed on Amazon!
2] Look for the Label: ASTM E1745: This is your single most important indicator of quality. ASTM E1745 is a standard specification for water vapor retarders used in contact with soil or granular fill under concrete slabs.
Why It Matters: A product that meets ASTM E1745 has been tested and certified for its strength, puncture resistance, and low permeance (≤0.1 perms). It is specifically engineered for building applications. When you see this designation on the roll’s label, you know you are getting a legitimate building product, not a repurposed piece of plastic.
Choose the Right Type for Your Climate and Project
The best barrier for you depends on your specific needs:
Standard Polyethylene (6-mil to 15-mil): The go-to for interior walls in cold-climate sheds and under slabs. It’s an impermeable Class I barrier.
Reinforced Polypropylene: A premium option that is incredibly tough and tear-resistant. Excellent for areas where durability is the top concern.
Smart Vapor Retarders (e.g., MemBrain): For complex situations like heated/cooled workshops in mixed-humid climates. These adaptive membranes allow drying when humidity is high, providing a safety net against trapped moisture.
Foil-Faced Foam Boards: A two-in-one solution providing insulation and a highly effective vapor barrier. Ideal for retrofits and achieving a high R-value in a thin profile.

Invest in the System: Buy the Right Tape
This cannot be overstated. Your vapor barrier is only as good as its seams.
The Solution: Use only the tape recommended by the vapor barrier manufacturer. This is typically a UL 181A-P or B-FX approved foil tape or a specially formulated sheathing tape. These tapes are designed with aggressive, long-lasting adhesives that bond chemically to the plastic and can withstand decades of temperature cycles without failing. Do not use duct tape.
The Final Calculation: Cheap Now vs. Costly Later
The math is simple, yet often ignored. The price difference between a cheap, thin plastic roll and a high-quality, ASTM-rated 10-mil poly sheet is typically $50 to $100. The cost of replacing rotten wall studs, sheathing, insulation, and siding—not to mention the potential loss of valuable tools or belongings to mold—runs into the thousands of dollars.
A quality vapor barrier, properly installed with the correct tape, is a one-time investment. It’s a silent guardian working 24/7 for the life of your structure. A cheap vapor barrier is a ticking time bomb, offering a facade of protection while secretly undermining your building from within.
When you’re at the store, remember that you’re not just buying a roll of plastic. You are buying the long-term health and durability of your shed, workshop, or garage. Choose the product that is built to last as long as the structure it’s protecting. Your future self will thank you.
Upgrade Your Shed Protection — Click to Discover Top Vapor Barriers on Amazon!
Related Reading
How to Install Vapor Barrier in a Shed
Is a 6-Mil Plastic Sheet Enough? Comparing Shed Vapor Barrier Materials
Why Your Shed Walls Are Growing Mold (and How to Stop It Fast)
How to Stop Ground Vapor Damage Before It Starts
Questions and Answers
Question: What is a vapor barrier, and why do I need one?
Answer: A vapor barrier is a sheet of material that helps keep moisture from getting into your walls, floors, or crawl space. It’s important because too much moisture can lead to mold, wood rot, and damage to your home’s structure.
Question: Why do cheap vapor barriers fail?
Answer: Cheap vapor barriers usually fail because they’re made from thin, low-quality plastic that rips or breaks down over time. Once it’s damaged, moisture can easily sneak through.
Question: How can a bad vapor barrier affect the air inside my home?
Answer: If your vapor barrier isn’t working, moisture can build up and cause mold or mildew. That can lead to musty smells and even trigger allergies or breathing problems.
Question: What are the signs that my vapor barrier might be failing?
Answer: You might notice damp or musty odors, wet spots on walls or floors, peeling paint, mold growth, or warped flooring—especially in areas like basements or crawl spaces.
Question: Does the thickness of a vapor barrier really matter?
Answer: Yes! Thicker vapor barriers (around 10–20 mils) are stronger and last longer. Thin, cheap ones (like 3–6 mils) can tear easily and don’t do a good job keeping moisture out.
Question: Are all vapor barriers the same?
Answer: Not at all. There are big differences in quality and materials. Some are reinforced or made to last for years, while cheaper ones may not even meet building standards.
Question: Can installation make a difference?
Answer: Absolutely. Even the best vapor barrier won’t work if it’s installed the wrong way. Small gaps, unsealed seams, or nail holes can let moisture through. Proper installation is just as important as the material itself.
Question: How can I make sure my vapor barrier won’t fail?
Answer: Choose a high-quality vapor barrier and have it installed by someone who knows what they’re doing. Make sure all seams are sealed tightly, and use a product that’s right for your home and climate.