
The tiny house movement has captured the imagination of thousands seeking a simpler, more affordable, and sustainable way of life. Amidst the backdrop of soaring housing costs and a growing desire for minimalism, people are turning creative ideas into beautiful, functional homes. One of the most striking and robust trends within this movement is the conversion of shipping containers into permanent dwellings.
These corrugated steel boxes, once solely the workhorses of global trade, are being reincarnated as modern, efficient, and incredibly cool living spaces. But how do you transform a cold, metal box into a warm, inviting home? It’s a journey that requires vision, planning, and a fair amount of elbow grease. This comprehensive guide will walk you through the entire process, from that first spark of inspiration to turning the key in the door of your new container home.

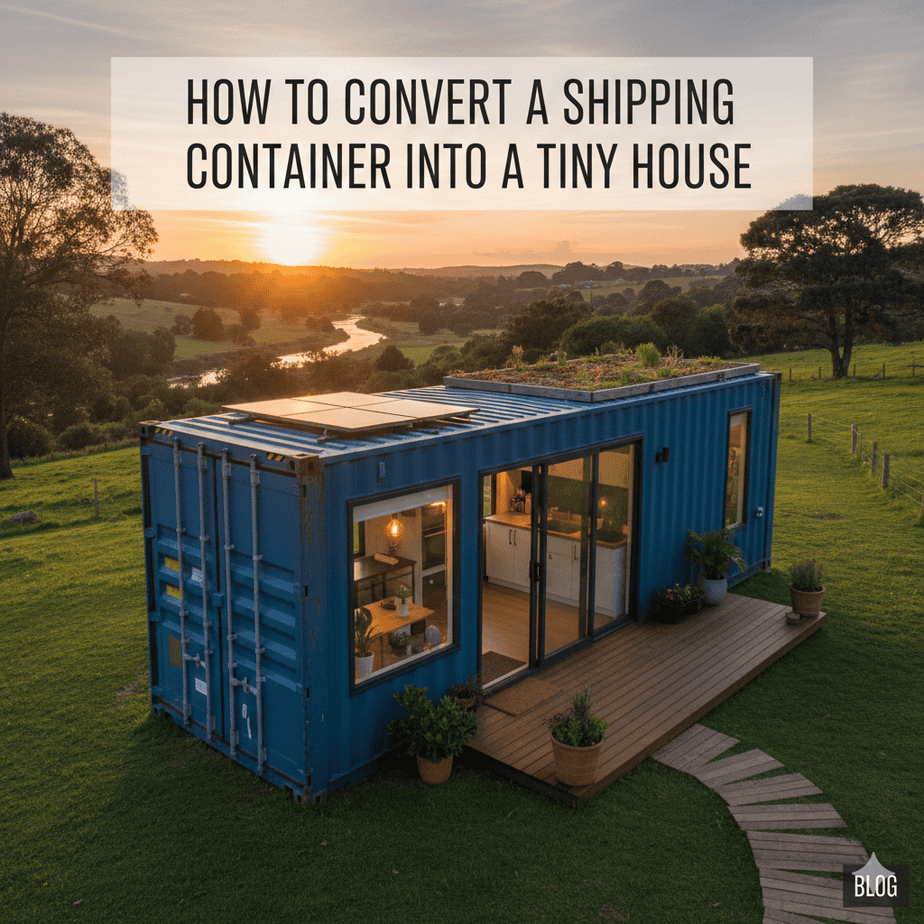
Converting a Shipping Container into a Tiny House
Quick Navigation Menu
Why Choose a Shipping Container Home?
Phase 1: Planning and Designing Your Shipping Container Home
Phase 2: The Foundation: A Solid Place to Set Your Container Home
Phase 3: The Transformation: Turning The Container Into Your Home
Phase 4: Making it a Home: Interior and Exterior Finishes
How Much Does It Cost to Convert a Shipping Container into a Tiny House?
What Size Shipping Container Is Best for a Tiny House?
How Do You Insulate a Shipping Container Home?
Can You Legally Live in a Shipping Container House?
How Do You Cut Windows and Doors in a Shipping Container?
How Do You Prepare the Foundation for a Container Tiny House?
What’s the Best Layout for a Shipping Container Tiny Home?
How Do You Add Plumbing and Electricity to a Container Home?
What Are the Pros and Cons of a Shipping Container Tiny House?
How Long Does It Take to Convert a Shipping Container into a Tiny House?
Why Choose a Shipping Container Home?
Before we dive into the “how,” it’s important to understand the “why.” What makes a shipping container such an attractive option for a tiny house?
First and foremost is durability. Built to withstand the harsh conditions of ocean travel, stacked high on cargo ships, and transported across the globe, shipping containers are incredibly strong. They are designed to bear immense loads and resist harsh weather, making them a structurally sound starting point for a home.
Affordability is another significant draw. A used shipping container can be purchased for a relatively low cost, especially when compared to the price of traditional building materials for a similar footprint. While the total conversion cost can add up, the initial investment in the “shell” is often lower.
Then there’s the appeal of sustainability. Repurposing a decommissioned shipping container is a form of upcycling on a grand scale. It gives a new life to an object that might otherwise sit in a port yard, and it reduces the demand for new raw building materials. This eco-friendly aspect is a core motivator for many container home enthusiasts.
Finally, the modularity of containers is a huge advantage. They are, by nature, designed to be stacked and combined. This allows for creative architectural designs. Want a two-story home? Stack two containers. Need more space? Place several side-by-side. The possibilities for expansion and unique layouts are a playground for creative minds.

Phase 1: Planning and Designing Your Shipping Container Home
This is the most critical phase of your entire project. Rushing the planning stage will lead to costly mistakes and frustrating delays later on. Measure twice, cut once—or in this case, plan exhaustively, build once.
Defining Your Needs and Vision
Start by asking the big questions. Who is this home for? A single person? A couple? A small family? What are your non-negotiable needs? Do you require a home office, a bathtub, a full-sized kitchen? How do you want the space to feel? Modern and industrial? Cozy and rustic? Your answers will directly shape your design.
Choosing the Right Container
The standard workhorse of the industry is the 40-foot High Cube container. It offers a good balance of space (about 320 square feet) and the extra foot of height (9’6″ internally compared to 8’6″ in a standard container) which is crucial for creating a livable interior. A 20-foot container can feel quite cramped as a full-time residence but works well for a compact cabin or studio. Using multiple containers obviously expands your options dramatically.
You’ll also need to choose between a new (one-trip) or a used container. A used container is cheaper and more sustainable, but inspect it carefully for rust, dents, and holes. Check the floor for signs of rot or chemical spills if it was used to transport unknown goods. A new container is more expensive but will be in pristine condition.
The All-Important Layout
Sketch out your floor plan. This is where the long, narrow shape of a container becomes your primary design challenge. A common and effective layout is an “open plan” that combines the kitchen, living, and dining areas to make the space feel larger. Bedrooms and bathrooms are then placed at one or both ends.
Consider the placement of every single element: bed, sofa, toilet, shower, kitchen counters, and appliances. Think about the flow of movement. Will you have to squeeze past the sofa to get to the kitchen? Is the bathroom door in a logical yet private location?
Navigating the Legal Maze: Permits and Zoning
This is the part that deflates many a dream, but it is non-negotiable. You must contact your local building department to understand the regulations in your area. Zoning laws will dictate if you can place a container home on a piece of land. Building codes will dictate how you must build it to be safe and legal.

Key questions to ask include:
– Are there minimum square footage requirements?
– What are the rules for foundations, insulation, and electrical/plumbing systems?
– Are there specific aesthetic requirements for the exterior?
– Obtaining the proper permits before you start work will save you from the nightmare of being forced to alter your home or, worse, dismantle it.
Phase 2: The Foundation: A Solid Place to Set Your Container Home
Your container needs a solid base. The foundation serves two crucial purposes: it supports the immense weight of the structure and, just as importantly, it lifts the steel box off the ground to prevent moisture buildup and rust.
Several foundation types are popular for container homes:
A concrete pier foundation is a common and cost-effective choice. It involves pouring concrete pillars at the corners (and sometimes mid-points) of the container. This elevates the structure and allows for good air circulation and access to utilities underneath. A strip footing foundation involves digging trenches and filling them with concrete to create continuous supports along the length of the container. This provides excellent stability.
A slab-on-grade foundation is a solid concrete pad poured at ground level. The container is then anchored directly to it. This is a very stable option but can make running utilities and inspecting the underside of the container more difficult.
Your choice of foundation will depend on your local soil conditions, climate, and budget. Consulting with a structural engineer or an experienced contractor at this stage is highly recommended.
Phase 3: The Transformation: Turning The Container Into Your Home
With a plan in hand and a foundation in place, the real transformation begins. This is where you turn the steel box into a house.
Step 1: Cutting and Framing
This is the most dramatic and irreversible step: cutting openings for doors and windows. Use your detailed plans to mark the exact locations on the container walls. This work requires professional-grade tools—specifically an angle grinder or a plasma cutter. Safety is paramount; wear gloves, goggles, and ear protection.
Once the openings are cut, you need to frame them. The corrugated steel walls are not flat, so you cannot simply install a window or door directly into the hole. You will need to weld or bolt structural steel members (like rectangular hollow sections) around the new openings to create a flat, strong frame for installing your windows and doors. This reinforces the structure, as cutting the steel removes some of its inherent strength.
Step 2: Insulation is Everything
This is arguably the most important step for comfort and energy efficiency. A steel box is a thermal nightmare; it gets very cold in the winter and unbearably hot in the summer. Proper insulation is not a place to cut corners.

There are three main approaches, each with pros and cons:
Spray Foam Insulation: This is often considered the gold standard for container homes. It is sprayed directly onto the interior walls, where it expands to fill every nook and cranny. It provides an excellent thermal barrier and also acts as a vapor barrier, helping to prevent condensation—the arch-nemesis of steel, as it leads to rust. The downside is that it is typically more expensive and is a job best left to professionals.
Panel Insulation: Rigid foam boards (like XPS or Polyiso) are a popular DIY-friendly option. They can be cut to fit between the wall studs. This method is less expensive but requires meticulous sealing of all the gaps to prevent thermal bridging (where heat escapes through the studs). You will also need to install a separate vapor barrier.
Batt Insulation: Fiberglass or mineral wool batts are a traditional and cost-effective option. However, they can absorb moisture if not perfectly sealed, which reduces their insulating properties and can promote rust. They require a fully framed wall to be installed effectively.
Your insulation choice will affect your interior wall thickness and overall square footage, so this decision must be integrated into your initial design.
Step 3: Utilities – The Guts of the Home
Now comes the installation of the electrical, plumbing, and HVAC systems. This is another area where professional help is strongly advised, especially if you are not experienced.
Electrical: Plan your entire electrical system—outlets, switches, light fixtures, and your breaker box. The wiring is typically run through conduit attached to the steel frame before the interior walls are closed up. Always hire a licensed electrician to connect your system to the main power source.
Plumbing: This requires careful planning. You need to map out the entire water supply and drain-waste-vent (DWV) system. In a container home, it’s most efficient to group “wet areas” like the kitchen and bathroom together to minimize the length of pipe runs. Holes will need to be cut in the floor or walls to bring in the main water line and run the sewer pipe out to your septic tank or city connection. Using PEX tubing for supply lines is popular due to its flexibility and ease of installation.
HVAC (Heating, Ventilation, and Air Conditioning): A tiny, well-insulated space can be heated and cooled efficiently. A mini-split system is an excellent choice as it provides both heating and cooling from a single, compact unit. Don’t forget about ventilation! A proper bathroom fan and a kitchen range hood are essential. Consider an Energy Recovery Ventilator (ERV) or Heat Recovery Ventilator (HRV) for a tightly sealed home to ensure a constant supply of fresh air without losing energy.
Step 4: Interior Framing and Walls
Even with spray foam, you will likely want to build an interior frame to create a surface for attaching your final wall finish, like drywall or shiplap. This is typically done with wood or light-gauge steel studs. This framing creates a cavity where your utilities can be neatly tucked away. Once the frame is up and the utilities are in place, you can install your drywall, paneling, or other chosen wall material.
Phase 4: Making it a Home: Interior and Exterior Finishes
The functional shell is now complete. The next phase is where your personal style shines through, turning the space from a construction site into your home.
Interior Finishes:
Floors: You have many options. Polished concrete is a modern, industrial look that pairs perfectly with the container’s origins. Laminate, luxury vinyl plank (LVP), and engineered wood are popular for their durability and warmth. Tile is great for bathrooms and kitchens.
Walls and Ceiling: Paint is the simplest finish. For a warmer feel, consider wood paneling or shiplap on the walls or ceiling to break up the monotony of drywall. Exposing a section of the original corrugated steel as an accent wall is a fantastic way to pay homage to the structure’s history.

Storage: In a tiny house, every inch counts. Built-in furniture is your best friend. Custom-built benches with hidden storage, lofted beds with drawers underneath, and floor-to-ceiling cabinets maximize your space efficiently.
Lighting: A combination of ambient, task, and accent lighting is key. Recessed LED lights save space on the ceiling, while strategically placed pendants over a kitchen island or sconces on the wall can add personality and warmth.
Exterior Finishes:
You can leave the container in its original “shipping” state for a raw, industrial look, but a coat of paint is highly recommended. Use a paint specifically designed for metal, and consider a light color to reflect sunlight and reduce heat absorption. You can also add traditional siding, wood cladding, or a living wall to blend the container more naturally into its environment.
Don’t forget the roof. While the container roof is watertight, adding a standing-seam metal roof over top of it, creating an air gap, can dramatically improve thermal performance by shading the primary structure.
The Final Walk-Through: A Reality Check
Converting a shipping container into a tiny house is an immensely rewarding project. It’s a testament to creativity, sustainability, and self-reliance. You will end up with a unique, durable, and personalized home that is a direct reflection of your vision and hard work.
However, it is crucial to be realistic about the challenges. It is a complex undertaking that requires a diverse set of skills, from welding and framing to electrical and plumbing. The costs, while often lower than a traditional home, can still be significant once you factor in the container, foundation, insulation, utilities, finishes, and professional help. The process is time-consuming and demands meticulous planning and patience.
If you are undaunted by these challenges, the journey of converting a shipping container into a tiny house can be one of the most fulfilling adventures of your life. It’s more than just building a house; it’s about building a lifestyle centered on intention, freedom, and the simple joy of a space that is truly, uniquely yours. So, roll up your sleeves, start sketching your dreams, and get ready to think inside the box.
How Much Does It Cost to Convert a Shipping Container into a Tiny House?
The cost to convert a shipping container into a tiny house varies dramatically, but a realistic range is between $20,000 and $100,000+. This wide disparity depends on the level of finish, DIY involvement, and container specifications.

– A basic, DIY-heavy conversion using a single 20ft container can start around $20,000. This budget covers the used container itself ($2,500 – $5,000) and essentials like insulation, framing, subfloor, and rough electrical/plumbing. Finishes will be simple and off-the-shelf.
– A professionally built, comfortable, and fully-equipped home, typically from a 40ft container, falls in the $50,000 to $80,000 range. This includes high-quality insulation, custom windows and doors, a complete kitchen and bathroom, HVAC systems, and interior finishes. This cost is comparable to many high-end tiny houses on wheels.
– Luxury conversions with high-end appliances, complex architectural designs, or multiple containers welded together can easily surpass $100,000.
Key cost factors include:
Container: Size, condition (new vs. used), and special features (e.g., high-cube).
Labor: DIY versus hiring professionals is the single biggest cost variable.
Site Work: Foundation, utility connections, and permits add significant upfront expense.
Interior Finishes: The quality of materials for flooring, cabinets, and countertops.
Ultimately, while a container shell seems inexpensive, the real expense lies in making it a livable,code-compliant home. A thorough budget must account for all systems and finishes beyond the initial steel box.
What Size Shipping Container Is Best for a Tiny House?
The ideal shipping container size for a tiny house balances space, functionality, and budget, with the 20-foot and 40-foot containers being the most popular choices.

– A standard 20-foot container (160 sq ft internally) is an excellent option for a single occupant or a minimalist seeking a compact, low-impact home. Its smaller scale makes it easier and cheaper to transport, place on a site, and insulate. However, the layout must be highly efficient, often featuring a combined living/sleeping area, a compact kitchen, and a wet bath. It can feel cramped for more than one person.
– The 40-foot container (320 sq ft) is the preferred choice for couples, small families, or anyone desiring a more conventional home layout. It comfortably accommodates a separate bedroom, a full kitchen, a dedicated living area, and a more spacious bathroom. This extra space makes daily living significantly easier and allows for more storage and amenities.
– For maximum headroom and comfort, a “High-Cube” container (9.5 ft tall instead of 8.5 ft) is highly recommended, regardless of length. The additional vertical space is crucial for installing a proper floor, ceiling insulation, and a ventilation system without feeling claustrophobic.
– Ultimately, the “best” size depends on your needs. Choose a 20-foot for simplicity and affordability, or a 40-foot for greater comfort and livability. Many builders also combine multiple containers to create unique, larger homes, but this increases complexity and cost significantly. Always prioritize a High-Cube model to enhance the overall sense of space.
How Do You Insulate a Shipping Container Home?
Insulating a shipping container home is critical for comfort and energy efficiency, primarily to prevent condensation and regulate temperature.
The three main methods are interior, exterior, and a hybrid approach, each with distinct advantages.
1. Interior Insulation: This is the most common method. Framing walls with studs creates cavities filled with batt insulation (like fiberglass or mineral wool) or spray foam. Closed-cell spray foam is a premium choice as it provides a high R-value (insulating power), an excellent moisture barrier, and adds structural rigidity. However, it is the most expensive option. The significant drawback of interior insulation is that it reduces the already limited interior space by several inches on each wall.
2. Exterior Insulation (Exterior Insulation Finish System – EIFS): Here, rigid foam boards are installed on the outside of the container, and then finished with a protective coating. This method preserves the entire interior square footage and effectively breaks thermal bridging—where heat escapes through the conductive steel frame. The main disadvantage is that it alters the iconic industrial look of the container.
3. Hybrid Approach: Many builders combine both methods for optimal performance. For instance, using a thin layer of spray foam on the interior to control condensation, supplemented by exterior rigid boards for enhanced thermal efficiency without sacrificing too much space.
The best choice depends on your climate, budget, and space requirements. Regardless of the method, proper installation of a vapor barrier is essential to manage moisture and ensure the longevity and health of your tiny home.
Can You Legally Live in a Shipping Container House?

Yes, you can legally live in a shipping container house in the United States, as no state has an outright ban. However, its legality is not automatic and hinges entirely on navigating your local jurisdiction’s specific rules and securing the proper permits.
The path to approval primarily involves three key areas: zoning laws, building codes, and private restrictions.
– Your first hurdle is local zoning laws, which dictate land use. You must confirm your property is zoned for residential use and that a non-traditional structure like a container home is permitted. Some areas have minimum dwelling size requirements that your design must meet.
– The most critical step is compliance with building codes. Your container home must meet the same safety standards as a conventional house. This involves obtaining permits and passing inspections for its structural integrity, permanent foundation, electrical systems, plumbing, and HVAC. Key requirements include proper emergency egress windows and doors and adequate insulation to prevent condensation and manage temperature.
– Finally, you must check for private deed or Homeowners Association (HOA) restrictions. Even with city approval, an HOA can prohibit non-traditional builds based on its covenants.
Therefore, the legal viability of a shipping container home depends overwhelmingly on your due diligence at the local level. Your essential first step is to contact your local building and zoning department to understand the specific ordinances for your property. Working with an architect or builder experienced with local codes is highly recommended to navigate this process successfully.
How Do You Cut Windows and Doors in a Shipping Container?
Cutting windows and doors into a shipping container is a critical step that requires careful planning and execution to maintain the structure’s integrity and ensure safety.
The process involves several key stages.
– First, precise planning is essential. You must decide on the exact size and location of each opening, carefully marking them on the container’s walls. A crucial rule is to avoid cutting into the primary structural components—the massive steel corner posts and the top and bottom roof/floor rails. Removing these will severely compromise the container’s strength. Instead, place your openings within the corrugated steel panels, where the material can be removed and then properly reinforced.
– The actual cutting is best done with power tools designed for metal. An angle grinder with a cut-off wheel is a common and accessible choice, offering good control for straight lines. For the cleanest and fastest cuts, a plasma cutter is the professional’s preferred tool, as it slices through the steel like a hot knife through butter. For longer, straight cuts, some builders use specialized metal circular saws or reciprocating saws with metal-cutting blades.
– Before any cutting, it is imperative to check for hazardous materials. Older containers may have lead-based paint or coatings containing other harmful chemicals, so proper personal protective equipment—including a respirator, gloves, and eye protection—is non-negotiable.
– Once the openings are cut, the raw edges must be ground smooth to remove burrs. Finally, the container must be reinforced around the new openings. This is typically done by welding a steel frame around the perimeter of the cut-out. This new frame bears the structural loads that were once handled by the removed wall sections, ensuring your container home remains strong and secure.
How Do You Prepare the Foundation for a Container Tiny House?
Preparing a solid, level foundation is the most critical first step in building a shipping container home, as it ensures structural integrity and prevents future problems.
The process begins long before the container arrives, with thorough site evaluation and ground preparation.
The first task is to choose a foundation type based on your soil conditions, climate, and local building codes. The three most common systems are pier, slab, and strip footings. A pier foundation involves pouring concrete piers at precise points to support the container’s corners and mid-spans. This is a popular choice as it is cost-effective, provides excellent ventilation and access for utilities, and works well on sloped sites. A concrete slab is another common option, where a full reinforced pad is poured, and the container is then anchored directly to it. This provides a very stable base and integrates well with the floor system. For less stable soils, continuous concrete strip footings can be used to distribute the weight more evenly.
Once the foundation type is selected, the site must be cleared, graded, and compacted to create a perfectly level building pad. The specific foundation is then constructed, with careful attention to ensuring it is perfectly square and level. Critical to this process is embedding heavy-duty steel anchor points or weld plates into the wet concrete. These anchors are what the container will be securely bolted or welded to, permanently locking it to the foundation and providing resistance against forces like high winds or seismic activity. Always consult with a structural engineer or local builder to ensure your foundation meets all necessary requirements for safety and durability.
What’s the Best Layout for a Shipping Container Tiny Home?
There is no single “best” layout for a shipping container tiny home, as the ideal design is deeply personal and depends on your specific needs, budget, and the number of occupants. However, by understanding efficient configurations, you can identify the perfect layout for your project. Your choice should be guided by your lifestyle.
– For solo dwellers or couples, a single-container layout is often sufficient. A twenty-foot container is perfect for a minimalist studio, typically placing a compact bathroom at one end and combining a kitchenette with a living and sleeping area. A forty-foot container offers more comfort for a one-bedroom home, allowing you to position a private bedroom and bathroom at one end and an open-plan kitchen and living area at the other.
– For small families or those desiring more space, connecting multiple containers opens up many possibilities. A side-by-side layout using two forty-foot containers creates a spacious central living zone with bedrooms on either end. An L-shaped design creates a private outdoor courtyard, perfect for entertaining. For smaller lots, a stacked two-story home doubles your living space without a larger footprint.
– To maximize any layout, embrace smart design strategies. Use high ceilings for lofted beds or tall storage cabinets. Incorporate multi-functional furniture like sofa beds and fold-down tables. Flood the space with natural light through large windows and use sliding glass doors to extend your living area onto a deck or patio. The best layout ultimately balances your spatial needs with your desired
How Do You Add Plumbing and Electricity to a Container Home?
Adding plumbing and electricity to a shipping container home involves a meticulous process that integrates these systems into the rigid steel structure while adhering to building codes. Careful planning before insulation and wall finishing is absolutely crucial for a successful and safe installation.
– For plumbing, the strategy revolves around creating a centralized “wet wall.” This is a vertical chase, typically built with wooden studs, that houses the supply and waste lines for the kitchen and bathroom. This consolidation minimizes the number of cuts needed in the structural steel. All pipes, especially those on exterior walls, must be heavily insulated to prevent freezing. The drainage pipes require carefully planned holes in the container floor, which are then sealed meticulously to maintain weatherproofing. The water supply is connected to a municipal source or a well, while waste is directed to a municipal sewer or a permitted septic system.
– Electrical work begins with a dedicated main service panel. The wiring, run inside protective metal or PVC conduit for safety, is typically installed within newly framed interior walls or in a chase between the ceiling and a new dropped ceiling. Strategically placed junction boxes provide access and house connections. Outlets, switches, and light fixtures are mounted after the insulation and interior wall sheathing, like drywall, are complete. A grounding system is bonded to the container’s steel frame to ensure safety.
Given the technical and safety-critical nature of this work, it is highly recommended to hire licensed professionals for both the plumbing and electrical installations. They will ensure all work meets local building codes, passes required inspections, and is safe for long-term occupancy.
What Are the Pros and Cons of a Shipping Container Tiny House?
The concept of transforming a steel shipping container into a tiny home has captured the imagination of many seeking an affordable, sustainable, and modern lifestyle. While the industrial aesthetic and perceived low cost are major draws, it is crucial to understand the full spectrum of advantages and challenges before committing to such a project.
The Pros: Strengths of a Container Home
– A primary advantage is the foundational structure itself. Shipping containers are inherently strong, durable, and designed to withstand harsh environments, making them resistant to heavy winds and pests. Their modular nature is a significant benefit; multiple containers can be welded together in various configurations like side-by-side or stacked to create unique, customizable layouts that range from compact studios to spacious multi-bedroom family homes.
– The sustainability appeal is another powerful motivator. Repurposing a decommissioned steel container is a form of recycling that gives a robust material a new life, reducing the demand for new construction materials like lumber and brick. This aligns with a minimalist, low-impact philosophy that many tiny house enthusiasts embrace.
– From a project management perspective, the basic shell arrives pre-fabricated. This can, in theory, expedite the initial enclosure phase of construction compared to building a traditional house frame from scratch. Furthermore, while not universally true, the potential for cost savings is a major draw. The initial cost of a used container is relatively low, and the compact space naturally leads to reduced expenses for heating, cooling, and maintenance over the long term.
The Cons: The Significant Challenges
– However, the path to a finished container home is fraught with often-underestimated challenges. The most prominent is the high cost of conversion. While the container itself is inexpensive, the expenses involved in making it livable are substantial. These include professional cutting and welding for windows and doors, extensive insulation, and the installation of all utilities, which can easily bring the total cost to rival or even exceed that of a conventional tiny house on wheels.
– The insulation issue is particularly critical. Steel is an excellent conductor of temperature, leading to a “thermal bridge” that can make the interior unbearably hot in summer and cold in winter. Mitigating this requires a sophisticated and often expensive insulation strategy, such as spray foam or exterior cladding, which also eats into the precious interior square footage.
– The legal and regulatory landscape can be a major hurdle. Many local zoning departments and building codes were not written with shipping container homes in mind. Obtaining permits requires proving the structure meets requirements for foundations, energy efficiency, egress, and structural integrity, a process that often demands stamped architectural and engineering plans. Furthermore, the presence of toxic chemicals is a serious concern. Older containers may have been treated with lead-based paints or pesticides on the wooden floor, requiring costly remediation or the sourcing of a “food-grade” or new container to ensure indoor air quality is safe.
– Finally, living within the confines of a corrugated steel box presents practical challenges. The standard width of 8 feet creates a narrow, tunnel-like feel that requires clever design to avoid. Every window and door requires a careful structural assessment, as improper cutting can compromise the container’s integrity. The cumulative effect of these challenges—from regulatory battles to the physics of temperature control—means that a successful container home project requires meticulous planning, a realistic budget, and a willingness to navigate significant complexity.
How Long Does It Take to Convert a Shipping Container into a Tiny House?
– Converting a shipping container into a tiny house is a multi-stage process, typically taking anywhere from four to eight months for a complete, professionally assisted build. The timeline can vary dramatically based on complexity, permitting, and whether you are doing the work yourself.
– The journey begins with planning and design, which includes creating detailed blueprints and securing financing. This is followed by the critical permitting phase, where you must obtain approval from your local building department. This stage alone can take several weeks or even months, depending on your jurisdiction’s specific regulations and how familiar they are with container homes.
– Once permits are secured, site preparation begins. This involves clearing the land, installing utility connections, and pouring a permanent foundation. With the site ready, the container is placed and the major structural work begins. This phase includes cutting openings for windows and doors, which must be done carefully to maintain structural integrity, and welding on any reinforcements.
– The longest phase is typically the interior build-out. This encompasses installing insulation and vapor barriers, framing interior walls, and running all electrical wiring, plumbing, and HVAC systems. The final stages involve hanging drywall, installing flooring, cabinets, and fixtures, and applying the final coats of paint.
– A simple DIY project may be finished faster, while a complex, custom-designed home with multiple containers will naturally take longer. The most significant variable is often the permitting process, so starting with a thorough understanding of your local requirements is the best way to create a realistic timeline.