
For the DIY enthusiast, building a shed is a rewarding project that adds valuable storage and workspace to your property. But any seasoned builder will tell you the same truth: a great shed starts from the ground up. The foundation is the most critical part of the entire build. Get it wrong, and you’ll face doors that won’t close, sagging floors, and premature rot. Get it right, and your shed will stand solid and true for decades.
Among the various foundation options, poured concrete, gravel pads, skids, the concrete deck block method stands out for its beautiful simplicity, affordability, and beginner-friendly nature. If you’re looking for a weekend-friendly project that requires no mixing of concrete or extensive excavation, this is the guide for you. We’ll walk through every single step of building a robust, level shed foundation using concrete deck blocks.

Quick Navigation Menu
Building a Shed Foundation with Concrete Deck Blocks
Phase 1: Planning, Materials, and Tools
Phase 2: Site Preparation – The Key to Longevity
Phase 3: Installing the Blocks – Precision Leveling
Phase 4: Constructing the Floor Frame
Phase 5: Final Touches and Moving Forward
Common Pitfalls to Avoid When Using Concrete Deck Blocks
Questions and Answers
How Do I Figure Out How Many Concrete Deck Blocks My Shed Foundation Will Require?
How Do I Prepare and Level the Ground Before Placing the Deck Blocks?
What Type of Lumber Works Best With Concrete Deck Blocks for a Shed Foundation?
How Far Apart Should Concrete Deck Blocks Be Spaced for Proper Support?
What Are the Advantages and Disadvantages of Using Deck Blocks Over a Concrete Slab?
How Do I Anchor the Shed to the Concrete Deck Blocks so It Doesn’t Shift or Lift?
Do I Need to Add Gravel or Drainage Under the Deck Blocks to Prevent Water Buildup?
How Do I Handle Uneven or Sloped Ground When Using Deck Blocks for a Shed Foundation?
Why Choose Concrete Deck Blocks for Your Shed?
Before we pick up a tool, let’s understand why this method is so popular.
The Advantages:
Cost-Effective: Significantly cheaper than a full poured concrete slab or permanent footings.
Accessible Skill Level: Requires minimal specialized tools or masonry experience. If you can measure, level, and dig, you can do this.
Speed: You can go from a patch of grass to a ready-to-build foundation in a single weekend.
Adjustability: Blocks can be shimmed or set deeper to compensate for minor slopes and imperfections, a forgiving feature for beginners.
Good Drainage: The elevated design allows air to circulate underneath, preventing moisture buildup that can rot wooden floor joists.
Non-Permanent: In most areas, this is considered a temporary, movable structure, which may bypass the need for a building permit (but you must always check your local codes!).
The Considerations:
Soil Stability: Best suited for stable, well-draining soils like clay, loam, or compacted gravel. Loose sand or constantly soggy ground is not ideal.
Frost Heave: In regions with deep ground freezing (frost lines), frost heave can shift the blocks. For sheds in cold climates, blocks should be placed below the frost line or on stable, well-drained base material.
Weight Capacity: Perfect for light to medium-duty sheds (wood storage, garden tools, general storage). For extremely heavy loads like large riding mowers or workshop machinery, a more substantial foundation might be better.
Ground Clearance: Elevates your shed floor by 6-8 inches, which can be a pro (for ventilation) or a con (if you want a flush, ground-level entrance).

Building a Shed Foundation with Concrete Deck Blocks
Phase 1: Planning, Materials, and Tools
Failing to plan is planning to fail. This phase is about setting yourself up for effortless execution.
Determine Your Shed Size and Design: You must know the exact footprint of your shed. This isn’t just the outer walls; it’s the critical measurement of the floor frame. A common shed size is 10 feet by 8 feet. Your floor frame, made from a perimeter of lumber (the rim joists) and internal supports (joists), will sit directly on the blocks.
Understand the Block Layout: Concrete deck blocks have a recessed top designed to hold a standard 2×6, 2×8, or 2×10 piece of lumber. Your floor joists will run perpendicular to the direction of the floorboards (typically the shorter span of the shed for strength).
Perimeter Blocks: You’ll need blocks under each corner of the shed and at intervals along the long rim joists.
Intermediate Rows: For a 10×8 shed, you’ll likely have one central row of blocks running down the middle to support the inner ends of the floor joists. The general rule is to support joists every 4 to 6 feet. For a 10-foot joist span, a central support row is essential.
Gather Your Materials:
Concrete Deck Blocks: Purchase enough for your layout. For a 10×8 shed with a central support row, you might need 10 blocks (4 corners, 4 along each long side, 2 in the center).
Pressure-Treated Lumber: This is non-negotiable. All wood that touches the blocks or is near the ground must be pressure-treated to resist rot and insects. You’ll need:
Rim Joists: 2×6 or 2×8 lumber for the outer perimeter of the floor frame.
Floor Joists: 2×6 or 2×8 lumber spaced 16 inches on-center inside the frame.
Beam Material (if needed): For the central support row, you may use a doubled-up 2×8 beam that rests on blocks and supports the inner ends of the joists.
Gravel: Approximately 3-4 inches of crushed stone or pea gravel for each block base. This provides drainage and a stable, level starting point.
Fasteners: Galvanized or coated structural screws (like deck screws) or nails for assembling the frame. Hurricane ties or joist hangers add significant strength.
Shims: Have some composite or plastic shims on hand for final micro-adjustments (never use wood shims, as they compress).
Tools You’ll Need:
– Safety glasses, gloves, hearing protection
– Tape measure (25-foot is ideal)
– Carpenter’s pencil
– Stakes and mason’s string
– Line level or 4-foot level
– Long, straight 2×4 (8-10 feet) and a 4-foot level for spanning across blocks
– Shovel, spade, and/or a post hole digger
– Tamper (hand or mechanical)
– Wheelbarrow for moving gravel
– Circular saw or miter saw for cutting lumber
– Drill/Driver with appropriate bits
– Framing square
– Reciprocating saw or handsaw (for any root cutting)

Phase 2: Site Preparation – The Key to Longevity
A level, stable base is 80% of the battle.
Step 1: Clear and Mark the Area.
– Remove all vegetation, roots, and rocks from an area at least 2 feet larger than your shed’s footprint on all sides. This gives you room to work.
– Drive a stake at what will be your shed’s highest corner (to minimize digging).
Step 2: Establish Your Layout with String Lines. This is the most important step for ensuring a square foundation.
– Drive a stake at your starting corner (Stake A).
– Measure out the length of your shed along one side and drive Stake B.
– Measure out the width and drive Stake C, using a 3-4-5 triangle method to ensure this corner is a perfect 90-degree angle. (From your corner stake, measure 3 feet along one string and 4 feet along the other; the diagonal between those two points should be exactly 5 feet. Adjust the stakes until it is.)
– Complete the rectangle with Stake D.
– Run tight mason’s string between all stakes, using a line level to ensure the strings are level. This string rectangle represents the outside of your shed’s floor frame.
Step 3: Dig and Prepare the Block Pads.
– Using your layout plan, mark the center point of each block location on the ground. You’ll dig a small pad for each block, roughly twice the block’s diameter and 4-6 inches deep. Remove the sod and loose
topsoil. Pour 3-4 inches of gravel into each hole and tamp it down firmly and evenly. This gravel pad is your first line of defense against water and frost.
Phase 3: Installing the Blocks – Precision Leveling
Now comes the satisfying part: seeing your foundation take shape.
Step 1: Set the First Block. Place your first concrete deck block on its gravel pad at your chosen starting (highest) corner. Place your long, straight 2×4 on top of the block and your 4-foot level on the 2×4. Tap the block down into the gravel with a hammer until the 2×4 is perfectly level in both directions. This block sets the benchmark for all others.
Step 2: Set the Remaining Perimeter Blocks. Move to the adjacent corner along the length of the shed. Place the block and level it side-to-side. Now, place the long 2×4 so it spans from your first, benchmark block to this new block. Place your level on the 2×4. By adding or removing gravel under the new block, you make the 2×4 perfectly level. This means the top surfaces of the two blocks are perfectly level with each other.
Repeat this process for all perimeter blocks. Always check level relative to your original benchmark block and in both directions. Use the mason’s strings as a guide to ensure blocks are aligned properly.
Step 3: Set the Intermediate Rows. For the central support row, measure carefully from your perimeter strings to find the centerline. Dig and prepare your gravel pads along this line. Set these blocks so their tops are level with the perimeter blocks, using the same spanning 2×4 technique. They do not need to be perfectly level front-to-back along this row, as the beam will sit on them; they must all be at the same height as the perimeter.

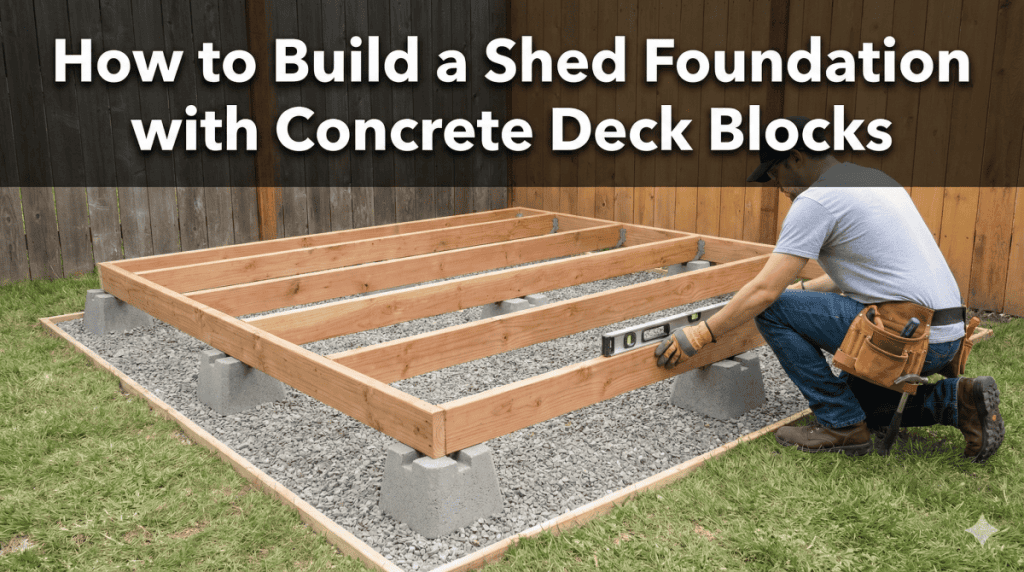
Phase 4: Constructing the Floor Frame
With all blocks perfectly placed and level, you’re ready to build the platform.
Step 1: Build the Perimeter Frame. Cut your pressure-treated rim joists to length. Assemble them on top of the blocks into a square rectangle, using your framing square to check for perfect 90-degree angles. Secure the corners with three galvanized screws or nails. This frame should sit neatly within your string lines, centered on the blocks.
Step 2: Install the Central Beam (if applicable). For sheds requiring a central support, construct a beam by nailing or screwing two long pieces of pressure-treated lumber together. Carefully lift and place this beam into the recesses of your center row of blocks.
Step 3: Install the Floor Joists. Mark the layout of your floor joists on the rim joists, typically 16 inches apart from the center of one joist to the center of the next (called “on-center” or O.C.). Cut your joist lumber to fit snugly inside the frame, perpendicular to your floorboards planned direction. Secure them using galvanized joist hangers—this is much stronger than toe-nailing. The ends of the joists will rest on the rim joist; their mid-span will rest on the central beam.
Step 4: Final Check and Shim.
Once the entire frame is assembled on the blocks, go around with your level and long 2×4 one last time. Place the 2×4 diagonally across the frame and in all directions. Any slight dips (more than 1/8 inch over 4 feet) can be corrected by sliding composite shims between the block and the lumber. Do not force the frame out of level to make it fit a block; adjust the block with shims.
Phase 5: Final Touches and Moving Forward
Anchoring (Optional but Recommended):
While the shed’s weight provides stability, in high-wind areas, it’s wise to anchor the frame to the blocks. You can drill a hole through the lumber into the concrete block recess and use a concrete anchor sleeve and bolt.
Next Steps:
Your foundation is now complete! You have a perfectly level, square, and robust platform ready for:
– Laying down your floor decking (usually 3/4-inch pressure-treated or exterior-grade plywood).
– Beginning the construction of your shed walls directly on top of this solid frame.
Common Pitfalls to Avoid When Using Concrete Deck Blocks
Skipping the Gravel: This leads to sinking and water pooling.
Using Untreated Lumber: This invites rapid rot and insect damage.
Assuming the Ground is Level: Always level each block individually.
Forgetting to Check for Square: A rhombus-shaped foundation leads to a nightmare of wall assembly.
Ignoring Local Codes: Always, always contact your local building department to check permit requirements and any regulations about shed foundations.
Building a shed foundation with concrete deck strips away the intimidation of foundation work. It demystifies the process, proving that with careful planning, methodical execution, and a focus on the twin pillars of level and square, you can create a professional-grade base for your backyard masterpiece. This foundation is more than just a place to set your shed; it’s the first and most important chapter in your DIY success story. Now, grab your tools, follow these steps, and lay the groundwork for a shed that will stand the test of time.

Related Reading
How to Build a Concrete Block Foundation for Your Garden Shed
Is a Gravel Shed Foundation a Good Idea?
What’s The Best Shed Foundation Option For You?
Should You Use a Permanent Foundation for a Shed?
How Do I Figure Out How Many Concrete Deck Blocks My Shed Foundation Will Require?
To determine the number of concrete deck blocks for your shed foundation, follow this systematic approach.
First, establish your shed’s perimeter. Measure the length and width. Deck blocks are typically placed at the corners and spaced evenly along the skids (long support beams). A standard spacing is 4 to 6 feet apart, center-to-center, to adequately support the shed’s load. Closer spacing (e.g., 4 feet) is recommended for heavier structures or softer ground.
Next, calculate the number of blocks per skid. For a 10-foot-long skid with 4-foot spacing, you’d start with a block at each end (0 ft and 10 ft). You’d likely need one additional block at the 4- or 5-foot mark to keep spacing under the maximum. So, that’s 3 blocks per skid.
Then, multiply by the number of skids. A standard small shed uses two skids. For our 10×8 shed example with two skids: 3 blocks/skid x 2 skids = 6 total blocks.
Crucially, for sheds wider than 4 feet, you must add interior support. This often means installing a central beam (girder) with its own row of blocks down the center. For our 10×8 shed, a center row would add another 3 blocks, bringing the total to 9 blocks.
Finally, add 1-2 extra blocks as contingency for irregularities. Always consult your shed plans for specific engineering, as heavy equipment or steep slopes may require more frequent support. This method ensures a stable, level foundation.

How Do I Prepare and Level the Ground Before Placing the Deck Blocks?
To prepare and level the ground for concrete deck blocks, meticulous site work is essential for a stable, long-lasting shed foundation.
– Begin by clearing the area of all vegetation, roots, and debris.
– Mark your shed’s exact perimeter with stakes and string.
– The critical step is establishing a level plane. Drive a tall reference stake at the presumed highest corner. Using a long, straight 2×4 and a 4-foot carpenter’s level, or a water level for greater distances, find and mark level points on the other perimeter stakes. Connect these marks with tightly pulled mason’s string; these are your guide lines for height.
– Now, excavate the entire area within the perimeter. You must remove the topsoil—the loose, organic layer that compresses over time—until you reach undisturbed, compact subsoil. The goal is a flat, uniform surface about 2-4 inches below your string lines.
– Next, add and compact a 2-3 inch layer of gravel or crushed stone. This base improves drainage, prevents frost heave in cold climates, and inhibits weed growth. Rake it level, then use a hand tamper or plate compactor to create a solid, firm base.
– Finally, verify your level. Place a long, straight board on the compacted gravel and check it with your level in multiple directions. Make fine adjustments by adding or raking gravel, not soil. Your deck blocks will now sit on a stable, perfectly level base, ensuring your shed foundation won’t settle or shift.
What Type of Lumber Works Best With Concrete Deck Blocks for a Shed Foundation?
For a shed foundation using concrete deck blocks, pressure-treated lumber rated for ground contact is essential. This lumber is chemically treated to resist rot, decay, and insect damage, which is critical as it rests close to moisture and soil.
The best choices are #1 or #2 grade pressure-treated Southern Yellow Pine or Douglas Fir, clearly stamped with “Ground Contact” or the more robust “UC4A” rating. Do not use standard kiln-dried spruce or pine, as it will quickly degrade.
For the skids (the primary longitudinal beams), use sturdy 4×4, 4×6, or even 6×6 timbers, depending on shed size and load. Deck blocks are designed to cradle these standard dimensions. A 4×4 is suitable for small, light sheds, but a 4×6 provides greater stiffness and is recommended for most 8×10 and larger sheds. For heavy equipment storage, opt for 6×6 timbers.
For the floor joists that will sit atop the skids, use pressure-treated 2×6 or 2×8 lumber, again chosen based on the shed’s span and floor load. All fasteners must be hot-dipped galvanized or corrosion-resistant to prevent reaction with the treatment chemicals.
Finally, seal any fresh cuts made on-site with a copper naphthenate wood preservative to maintain the protective envelope. This combination of correctly rated, adequately sized pressure-treated lumber on a leveled gravel base will create a solid, durable foundation that lasts for decades.

How Far Apart Should Concrete Deck Blocks Be Spaced for Proper Support?
For proper support, concrete deck blocks should be spaced 4 to 6 feet apart, center-to-center, along your foundation’s skids (the main support beams). This range balances stability with material efficiency.
The precise spacing depends on two key factors: the size and strength of your skid lumber and the shed’s intended load. For standard pressure-treated 4×6 skids under a typical garden shed, 6-foot spacing is often adequate. However, for heavier loads (like riding mowers or workshops) or if using 4×4 lumber, reduce spacing to 4 or 5 feet for added safety and to prevent floor sag.
To calculate, start by placing a block at each end of every skid. Then, evenly distribute the remaining blocks between them, ensuring no span exceeds your chosen maximum (e.g., 6 feet). For a 10-foot-long skid with 6-foot max spacing, you’d need three blocks: one at 0 feet, one at 5 feet (the midpoint), and one at 10 feet.
Crucially, all blocks must rest on a level, compacted base to share the load equally. Uneven settling can cause some blocks to bear disproportionate weight, defeating the purpose of close spacing.
Finally, for sheds wider than 8 feet, a center girder with its own row of blocks is usually necessary, following the same spacing rules. When in doubt, err on the side of more frequent support—the minor added cost of extra blocks is cheap insurance for a rigid, durable floor.
What Are the Advantages and Disadvantages of Using Deck Blocks Over a Concrete Slab?
Using concrete deck blocks for a shed foundation offers distinct advantages and disadvantages compared to a poured concrete slab.
The primary advantages are cost, simplicity, and flexibility. Deck blocks are significantly less expensive and require no mixing, forming, or professional finishing. The installation is a straightforward DIY project that can be completed in a weekend with basic tools. They provide excellent drainage, reducing frost heave risk in cold climates, and allow for easy adjustment or relocation of the shed in the future.
However, the disadvantages center on stability and longevity. A slab provides a permanent, monolithic, and perfectly level base resistant to shifting. Deck block foundations, relying on separate supports, are more susceptible to differential settling if the ground isn’t impeccably prepared and compacted. They are generally unsuitable for heavy loads like large workshops or garages, and the exposed wood frame remains vulnerable to pests unless meticulously maintained.
In summary, choose deck blocks for cost-effective, DIY-friendly support for light-to-medium sheds on stable, well-draining soil. Opt for a concrete slab for heavy-duty, permanent installations where a perfectly flat, rigid, and durable floor is a priority, despite the higher cost and labor.

How Do I Anchor the Shed to the Concrete Deck Blocks so It Doesn’t Shift or Lift?
To securely anchor your shed to concrete deck blocks and prevent shifting or lifting, particularly in high winds, you must create a positive mechanical connection. Relying on the shed’s weight alone is insufficient.
The most effective method involves using post bases or anchor brackets. First, ensure your wooden skids are properly seated in the block’s saddle. Then, secure a simpson CB84 or similar concrete block anchor to the top of the deck block using concrete wedge anchors or sleeve anchors. This metal bracket has a built-in holder that your wood skid fits into, and it is then fastened through the side with structural screws. This prevents both lateral movement and uplift.
An alternative is using heavy-duty galvanized steel strapping or angle brackets. Drill into the concrete block using a masonry bit and install a concrete anchor. Attach one side of a metal “L” bracket or a long strap to this anchor, and screw the other side directly into the side or bottom of your shed’s skid frame. This creates a strong tie-down point.
For maximum security in storm-prone areas, combine these block-level anchors with earth anchors (auger-style) and steel cables attached to the shed’s corners. This system resists extreme uplift forces.
Avoid simply driving long nails or screws at an angle into the block, as this provides minimal holding power. Proper mechanical anchoring ensures your shed remains level, square, and securely grounded for its entire lifespan.
Do I Need to Add Gravel or Drainage Under the Deck Blocks to Prevent Water Buildup?
Yes, adding a compacted gravel base under each deck block is strongly recommended and often essential to prevent water buildup and ensure a long-lasting foundation.
Gravel (typically crushed stone or “3/4-inch minus” gravel) serves three critical functions. First, it provides drainage, allowing water to percolate down and away from the bottom of the block and wood, preventing rot and rust. Second, it creates a stable, non-frost-susceptible layer. Unlike soil, which expands when frozen (causing frost heave), gravel drains too quickly to hold water that can freeze and lift your blocks. Third, it offers a level and compactable surface for the blocks to sit on, preventing settling.
To do it correctly, excavate each block location slightly wider than the block itself and about 4-6 inches deep. Fill this hole with gravel, compacting it firmly in 2-inch layers with a hand tamper until you have a solid, level pad that sits just above the surrounding grade to shed water. The block is then placed atop this pad. This simple step mitigates the primary causes of foundation failure—water and frost—and is a minimal investment that protects your entire shed structure from shifting, settling, and moisture damage.

How Do I Handle Uneven or Sloped Ground When Using Deck Blocks for a Shed Foundation?
When building on a slope with deck blocks, the goal is to create a level foundation by adjusting the height of the blocks, not by excavating a perfectly flat terrace, which can compromise stability.
Start by identifying the highest corner of your planned shed area. This spot will require the least adjustment and becomes your reference point. Here, place your first block on a compacted gravel base as usual.
Next, establish your level reference lines. Use batter boards and mason’s string to create a perfectly level perimeter grid at the planned height of your shed’s skids. Measure vertically down from these strings to determine the required height for each subsequent block.
For gentle slopes, you can often adjust by varying the amount of well-compacted gravel under each block pad. For more significant elevation changes, you must extend the blocks upward. The safest method is to use solid concrete pier blocks with embedded metal post saddles, allowing you to insert a cut-to-length pressure-treated 4×4 or 6×6 post. This creates a stable column that brings each support point up to your level string line.
Alternatively, you can stack and mortar standard deck blocks, though this is less stable for heights over 8 inches. The finished foundation will have columns of varying heights, but their tops must all sit perfectly level and plane to ensure your shed frame is square and bears weight evenly. Always use a long level across multiple blocks for final verification.