
For many homeowners, adding a garden shed is a transformative project. It declutters the garage, creates a dedicated space for hobbies, and brings order to the garden. But before you get swept up in choosing the perfect shed design, there’s a critical, ground-level decision that will determine the longevity and stability of your entire structure: the foundation.
A poorly built base leads to a world of problems—warped doors that won’t close, uneven floors, premature rot, and a shed that looks like it’s sinking into the earth. Among the various options, using concrete blocks foundations for garden sheds stands out as one of the most popular, practical, and DIY-friendly methods. It’s more stable than gravel grids, less permanent and costly than a full concrete slab, and offers excellent ventilation to prevent moisture buildup.
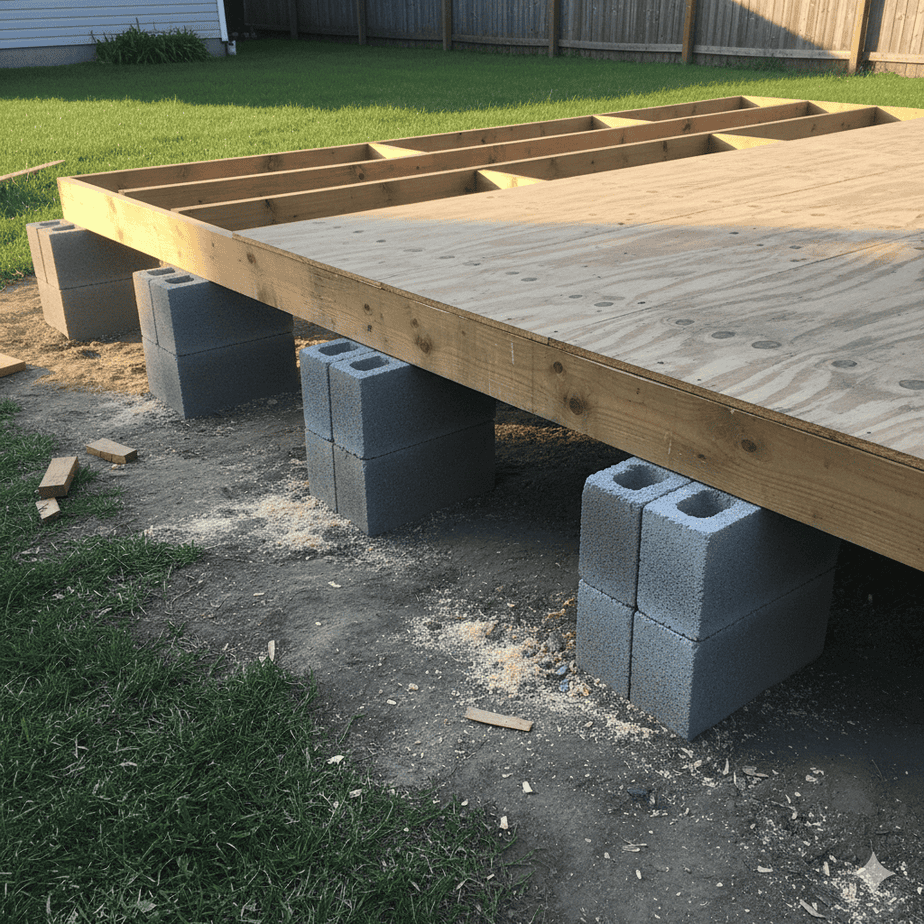
How to Build a Concrete Block Foundation for Your Garden Shed: A Step-by-Step DIY Guide
This comprehensive guide will walk you through every single step of building a robust, level, and long-lasting concrete block shed foundation. By the end, you’ll have the knowledge and confidence to create a base that will keep your shed solid and square for decades.

Quick Navigation Menu
Why Choose a Concrete Block Foundation?
Understanding Concrete Block Dimensions and Types
How to Build a Concrete Block Foundation
Step 1: Planning, Layout, and Using a Concrete Block Calculator
Step 2: Site Preparation and Excavation
Step 3: Installing the Gravel Base
Step 4: Setting and Leveling the Concrete Blocks
Step 5: Adding Timber Beams (The Sill Plate) – Optional but Recommended
Step 6: Final Checks and Shed Installation
Maintenance and Concrete Block Foundation Repairs
Questions and Answers
What Materials Do I Need to Build a Concrete Block Foundation?
How Deep Should the Foundation Trench Be for Concrete Blocks?
Do I Need to Install Drainage or Gravel Under the Concrete Block Foundation?
How Do I Ensure the Foundation Is Level Before Placing the Shed on It?
What Type of Concrete Blocks Work Best for Shed Foundations?
Can a Concrete Block Foundation Support Heavy or Large Sheds?
What Are the Most Common Mistakes to Avoid When Building a Block Foundation?
Why Choose a Concrete Block Foundation?
Before we dive into the how, let’s solidify the why. A concrete block foundation offers a compelling set of advantages:
Cost-Effective: Compared to pouring a full concrete slab, the material costs for concrete blocks and gravel are significantly lower.
DIY-Friendly: It requires no complex formwork or concrete mixing. The skills needed—digging, leveling, measuring—are within reach of most determined DIYers.
Excellent Drainage & Ventilation: The gaps between the blocks and the raised nature of the base allow water to drain away and air to circulate freely under your shed, fighting moisture and rot.
Adjustable & Forgiving: Minor settling can often be corrected by adjusting the gravel beneath a block, a flexibility you don’t get with a monolithic slab.
Non-Permanent: In many areas, a concrete block foundation may not be considered a permanent structure, which can simplify permits (though you should always check local building codes first).
However, it’s not perfect for every situation. It’s less ideal on steep slopes or very soft, unstable soil. For those scenarios, deeper pier foundations or a full slab might be better. But for most level to moderately sloped backyards, it’s an excellent choice.
Understanding Concrete Block Dimensions and Types

– Not all blocks are created equal. A standard concrete block, often called a cinder block or CMU (Concrete Masonry Unit), typically measures 16 inches long, 8 inches high, and 8 inches wide. These are the most common units used for shed bases. You might also encounter half-blocks or solid blocks. For a shed foundation, the standard hollow-core block is usually sufficient.
– It’s crucial to use concrete blocks designed for load-bearing applications, not lightweight decorative landscaping blocks. The high-compression strength of a proper concrete block is what will safely bear the weight of your shed and everything inside it.
Gathering everything before you start is the hallmark of a well-planned project. Here’s your checklist:
Tools:
– Tape Measure (25 ft. or longer)
– Carpenter’s Level (a 4-foot level is ideal, but a 2-foot will work)
– String Line and Stakes
– Shovel (a spade and a flat shovel)
– Digging Bar (for breaking tough soil)
– Wheelbarrow
– Hand Tamper or Plate Compactor (rentable)
– Garden Rake
– Mason’s Line Level
– Safety Glasses & Work Gloves
– Circular Saw or Handsaw (for cutting any timber beams)
Materials:
Concrete Blocks: The quantity depends on your shed size and layout (more on this next).
Gravel: Use ¾-inch crushed stone or “crusher run.” This provides a stable, draining base. You’ll need enough for a 4-6 inch layer under each block footprint.
Landscape Fabric (Optional but Recommended): Placed under the gravel, this suppresses weed growth and prevents the gravel from mixing with the soil over time.
Pressure-Treated Lumber (Optional): If your shed requires a floor frame (joists), you’ll need 4×4 or 6×6 timbers to run along the rows of blocks for the joists to sit on.
Construction Adhesive (Optional): For securing timber beams to the tops of the blocks.

Step 1: Planning, Layout, and Using a Concrete Block Calculator
This is the most important phase. Rushing here guarantees problems later.
Check Local Regulations: Always, always contact your local building department. Ask if you need a permit for a shed on a concrete block foundation. Also, inquire about setback requirements (how far from property lines/fences the shed must be) and any restrictions on foundation types.
Site Selection: Choose a level, well-drained area. Consider access, sunlight, and how you’ll use the shed. Clear the area of all vegetation, rocks, and debris.
Determine Your Block Layout: Your concrete block foundation must support the shed’s floor frame. Most shed floors are built with perimeter joists and interior cross-joists.
– Blocks must be placed under all four corners of the shed.
– Additional blocks must be placed at regular intervals along the shed’s length and width to support the intermediate joists. A common spacing is every 4 to 6 feet.
– The shed manufacturer’s manual will often specify the required foundation support points. This is your best guide.
– To estimate how many blocks you need, you can use a simple mental concrete block calculator. For an 8×10 ft shed with blocks spaced 4-5 feet apart along the perimeter and one central row, you’ll likely need 9 blocks (3 rows of 3). For a 10×12 ft shed, you might need 12 (3 rows of 4). Always buy 10% extra.
Mark the Perimeter:
– Measure and mark your shed’s footprint on the ground. Use the string line and stakes to create perfectly straight lines for the perimeter.
– Use the 3-4-5 triangle method to ensure your corners are perfectly square. Measure 3 feet along one string, 4 feet along the adjacent string, and the diagonal between those points should be exactly 5 feet. Adjust the strings until it is.
Step 2: Site Preparation and Excavation

Now, you transform the marked area into a stable building site.
Lay Landscape Fabric: Roll out the fabric within your staked area. This step saves countless hours of weeding later.
Excavate for Block Pads: You are not excavating the entire area. You only need to dig holes where each concrete block will sit. Dig these holes roughly 12 inches wider than the block on all sides (so a 40×40 inch pad for a standard 16×8 inch block) and about 6-8 inches deep. This creates a “pad” for your gravel base.
Ensure a Level Base: Use your shovel and rake to make the bottom of each hole as flat as possible. Don’t worry about perfection yet—the gravel will help with final leveling.
Step 3: Installing the Gravel Base
The gravel base is the unsung hero of a durable concrete block shed foundation. It provides drainage, prevents frost heave by allowing water to drain away, and gives you a stable medium to adjust your blocks.
Add Gravel: Pour 4-6 inches of crushed stone into each excavated hole.
Compact Thoroughly: Use your hand tamper or plate compactor to smash the gravel into a solid, compacted layer. This is critical—skipping proper compaction is a leading cause of settling. Compact until the gravel feels rock-solid and doesn’t shift underfoot.
Level the Gravel Pads: Use a long, straight 2×4 and your level across the tops of the compacted gravel pads. Your goal is to get all the gravel pads roughly level with each other. Add or remove gravel as needed.
Step 4: Setting and Leveling the Concrete Blocks
This is the precision stage where your patience pays off. The mantra here is: Level, Level, and Level Again.
Place the First Block: Set your first concrete block in the center of its compacted gravel pad. This will likely be a corner block.
Level It Two Ways: Place your level on top of the block. Check for level front-to-back and side-to-side. Tap the block down with a rubber mallet or the handle of your hammer to settle it into the gravel. To raise a corner, add a handful of gravel under that side.
Set the Opposite Corner: Move to the diagonal opposite corner block. Set and level this block by itself.
Establish Your String Lines: Run string lines between your two set corner blocks, just skimming the top outside edges. These strings become your guide for the height and alignment of all other blocks.
Set the Remaining Blocks: Work your way around the perimeter, placing each block so its top just touches the underside of the string line. Use your level on each individual block (both directions) and also check that it aligns with the string. The string ensures all blocks are at the same height, while the level ensures each block is not tilted.
Check the Entire Grid: Once all perimeter blocks are set, place a long, straight 2×4 across multiple blocks and set your level on top of it. Check for level across the entire foundation in multiple directions. Make micro-adjustments now—it’s impossible once the shed is on top.
Step 5: Adding Timber Beams (The Sill Plate) – Optional but Recommended
For most wooden shed floors, you’ll now install pressure-treated timber beams (called sills or mudsills) on top of the concrete block rows. This provides a solid, continuous surface to anchor your floor joists.

Cut Timbers to Length: They should run the full length/width of your shed’s footprint.
Place Timbers on Blocks: Center the timbers on the rows of blocks.
Secure the Timbers (Important): Use a high-quality construction adhesive (like Liquid Nails for landscapes) to “glue” the timber to the concrete block. For added security, especially in windy areas, you can drill and use concrete anchor straps or tie-downs. This step connects your shed to the concrete block foundation, enhancing stability.
Step 6: Final Checks and Shed Installation
You’re in the home stretch!
Double-Check Everything: Re-measure diagonals to confirm squareness. Do a final level check across all timbers or blocks.
Prepare for Delivery/Assembly: Your foundation is ready. If you’re having a pre-built shed delivered, ensure there is clear access. If you’re building a kit, you can now start assembling the floor frame directly on the timber beams, screwing it securely into the wood.
Anchor the Shed: Once the shed is in place, it is highly advisable to anchor it to the concrete block foundation. Use hurricane ties or anchor kits designed for sheds, securing the shed’s wall frame to the timber sills. This prevents wind uplift and theft.
Maintenance and Concrete Block Foundation Repairs
A well-built concrete block foundation is low-maintenance, but it’s not invisible. As part of your annual home maintenance, walk around your shed.
– Look for any signs of settling: a block that appears to have sunk, or a corner of the shed that seems out of alignment.
– Inspect for vegetation growing too close, which can trap moisture.
– The topic of concrete block foundation repairs for sheds is usually straightforward. If a block settles, you can often remedy it by:
– Using a car jack (with a wood block to protect the shed frame) to slightly lift the affected corner.
– Removing the block and adding more gravel, re-compacting it.
– Re-setting the block and re-leveling.
This repairability is a key advantage over more rigid foundation types.

Conclusion: A Foundation for the Years
Building a concrete block shed foundation is a project that rewards careful planning, patience, and a focus on the fundamentals of leveling and compaction. By investing a weekend in this process, you’re not just stacking blocks; you’re creating a stable, durable platform that will protect your investment, ensure your shed doors open smoothly for years, and provide a reliable space for everything from lawnmowers to cherished tools.
Remember, the strength of your entire shed is built from the ground up. With this step-by-step guide, you have the blueprint to create a concrete block foundation that is equal parts practical, economical, and utterly dependable. Now, grab your level and get building
What Materials Do I Need to Build a Concrete Block Foundation?
To build a durable and level concrete block foundation for your shed, you’ll need a specific set of materials. First and foremost, you need the concrete blocks themselves. Standard hollow-core blocks, typically 16x8x8 inches, are the most common and cost-effective choice. The exact quantity depends on your shed size and layout, but plan for blocks at each corner and spaced every 4-6 feet under supporting walls and floor joists.
The second critical material is drainage gravel, specifically ¾-inch crushed stone. This is not optional. You’ll need enough to create a 4-6 inch thick, compacted layer under each block location to prevent settling and frost heave. For a cleaner, long-lasting base, a roll of landscape fabric to place under the gravel is highly recommended to suppress weeds.
For the shed’s connection to the base, pressure-treated lumber (like 4x4s or 6x6s) is used as a sill plate to sit on top of the block rows. Secure these to the blocks with a tube of construction adhesive designed for masonry. Finally, gather essential tools: a shovel, tape measure, a long carpenter’s level, a string line, stakes, and a hand tamper for compacting the gravel. With these materials and tools assembled, you’re ready to build a solid foundation.
How Deep Should the Foundation Trench Be for Concrete Blocks?
The required depth for a concrete block foundation trench is not a single number, as it depends on three key factors: local climate, soil type, and the structure’s weight. For a typical garden shed, a common and effective guideline is to excavate holes or trenches deep enough to accommodate a 4- to 6-inch compacted gravel base, plus the full height of the concrete block itself. This often results in a total dig depth of 10 to 14 inches.
The most critical rule is to dig below the frost line in your region if you experience freezing winters. Frost heave occurs when water in the soil freezes and expands, which can lift and crack your foundation. Local building codes specify the exact frost depth, which can range from a few inches to several feet. Always check this first.
For stable, well-draining soil in a mild climate, the 10-14 inch depth focusing on a solid gravel base is usually sufficient for a shed. For heavier structures or poor soil, you may need to pour concrete footings below frost depth and set the blocks on top. The essential principle is to reach stable, undisturbed soil and ensure proper drainage to create a permanent and level base.
Do I Need to Install Drainage or Gravel Under the Concrete Block Foundation?

Absolutely yes. Installing a proper gravel base is not just a recommendation—it is an essential, non-negotiable step for building a durable concrete block foundation. Skipping this step is the leading cause of foundation failure, leading to settling, shifting, and a unstable shed.
Gravel serves three critical functions. First, it provides drainage. Water naturally percolates through the crushed stone, diverting it away from the bottom of your concrete blocks. This prevents water from pooling under your shed, which causes wood rot and attracts pests. Second, it creates a stable, compactable base. When tamped down firmly, the gravel pad distributes the shed’s weight evenly and prevents the blocks from sinking into soft soil over time. Third, in colder climates, it helps mitigate frost heave. By allowing water to drain away instead of sitting in the soil beneath the block, it reduces the potential for freezing and thawing cycles to lift your foundation unevenly.
For best results, use at least 4-6 inches of ¾-inch crushed stone or “crusher run” gravel in each excavated hole. Compact it thoroughly with a hand tamper until it is rock-solid before setting your concrete blocks. This simple layer is the key to transforming a patch of ground into a permanent, load-bearing foundation.
How Do I Ensure the Foundation Is Level Before Placing the Shed on It?
Achieving a perfectly level concrete block foundation is the most critical step for a stable shed. The process requires patience and methodical checking. Begin during the gravel stage: after compacting 4-6 inches of crushed stone in each hole, use a long, straight 2×4 and a 4-foot carpenter’s level to ensure all gravel pads are roughly even with each other.
The precision work happens when setting the concrete blocks. Start by placing and leveling your first corner block in both directions. Then, set the diagonal opposite corner block and level it independently. Now, run tight string lines between these two established corners, just skimming their tops. These strings become your master guide for height. As you place each remaining block, its top should just touch the string, and you must also check that each individual block is perfectly level side-to-side and front-to-back with your carpenter’s level.
For the final, crucial verification, place your long 2×4 across multiple concrete blocks in different directions—diagonally, lengthwise, and widthwise. Lay the level on the board. Any gap or tilt means you must adjust the underlying gravel in that specific block’s pad. Do not proceed until the entire grid is level in all directions. This meticulous process ensures your shed won’t rack, twist, or have doors that fail to close.
What Type of Concrete Blocks Work Best for Shed Foundations?
For a durable and stable concrete block foundation, you must select the correct type of block. The best and most common choice is the standard hollow-core concrete masonry unit (CMU), typically measuring 16 inches long, 8 inches high, and 8 inches wide. These blocks are specifically engineered for load-bearing applications, making them ideal for supporting the significant weight of a shed and its contents.
Their hollow design offers an excellent strength-to-weight ratio and provides flexibility for anchoring if needed. Crucially, you must ensure you are purchasing concrete blocks rated for foundation and construction work, not lighter, decorative landscape blocks which can crack under structural load. Avoid using “patio blocks” or solid pavers, as their smaller footprint can lead to settling.

Can a Concrete Block Foundation Support Heavy or Large Sheds?
Yes, a properly engineered concrete block foundation is fully capable of supporting heavy or large sheds, such as those storing riding lawn mowers, workshop equipment, or extensive storage. The key lies in adapting the standard design to handle the increased load.
For heavier structures, you must first ensure a more robust base. This means excavating deeper to reach undisturbed soil, using a thicker and more thoroughly compacted gravel base (6+ inches), and potentially pouring concrete footings below the frost line for the blocks to sit on. The concrete blocks themselves should be standard, high-compression load-bearing blocks. For extreme loads, some builders opt for solid blocks or double-stack blocks in key locations.
Most critically, you must increase the number of support points. A large shed requires a tighter grid of concrete blocks, often spaced 3-4 feet apart center-to-center, rather than 4-6 feet. Always follow the shed manufacturer’s engineered foundation plan, which will specify the required pier locations. For a custom-built large shed, consulting local building codes or a structural engineer is advisable. With this enhanced planning and support, a concrete block foundation provides a formidable and reliable base for virtually any backyard shed.
What Are the Most Common Mistakes to Avoid When Building a Block Foundation?
Building a concrete block foundation for your shed is a highly achievable DIY project, but its long-term success hinges on avoiding a few critical errors. These common mistakes can lead to a frustrating cascade of problems: doors that won’t close, floors that sag, and a structure that leans or settles unevenly. By understanding and sidestepping these pitfalls, you ensure your foundation provides a solid, permanent base for decades.
The first, and perhaps most foundational, mistake is poor site preparation and planning. This includes failing to check local building codes and setback requirements, which could force you to dismantle your shed later. It also means not properly clearing and leveling the ground. Attempting to build on soft, organic topsoil or a significant slope without proper grading guarantees instability. Always start by removing all grass and roots, and use a string level to assess the slope of your chosen site.
A directly related and disastrous error is skipping or skimping on the gravel base. Placing concrete blocks directly on dirt is an invitation for trouble. Soil retains moisture, expands and contracts with frost, and compresses unevenly under load. Without a 4-to-6-inch layer of compacted, crushed stone for drainage and stability, your blocks will inevitably sink and shift. The gravel base is non-negotiable; it’s the essential buffer that separates your foundation from problematic soil.
The most technically demanding aspect is achieving perfect level, and the mistake here is imprecise leveling and layout. Rushing the leveling process or only checking individual blocks leads to a wobbly foundation. You must use a long, reliable level and a tight string-line system to ensure every concrete block is not only level on its own but also perfectly level with all the others across the entire grid. A block that is even half an inch out of alignment can translate into major structural issues for the shed frame built on top of it.

Two critical calculation errors involve support and spacing. Incorrect block spacing is a frequent issue. Placing blocks only at the four corners of a large shed will cause the floor joists to sag dramatically in the middle. Blocks must be placed at regular intervals (typically every 3 to 5 feet) to directly support the shed’s floor framing. Consult your shed plans to place blocks under all load-bearing points. Similarly, using the wrong type of block compromises integrity. Lightweight landscaping blocks or pavers are not designed for structural loads and will crack. Always use standard, heavy-duty, load-bearing concrete blocks (CMUs).
Finally, two often-overlooked mistakes concern finishing the job. Neglecting to anchor the shed to the foundation leaves it vulnerable to high winds, which can lift or shift the entire structure. Use appropriate anchor straps or ties to secure the shed’s wooden frame to the concrete blocks or the timber sill plates. Secondly, ignoring drainage around the foundation can undermine your work. Ensure the ground around your shed slopes away to direct rainwater runoff. Adding a gravel perimeter or a shallow French drain can prevent water from pooling around the blocks and washing out the supporting soil.
By meticulously planning your site, investing in a proper gravel base, taking infinite care with leveling, providing adequate support with the right materials, and securing the finished structure, you transform a simple stack of blocks into a trustworthy concrete block foundation that will stand the test of time and weather.
Related Reading
Is a Gravel Shed Foundation a Good Idea?
What’s The Best Shed Foundation Option For You?
How to Build a Post and Beam Shed Foundation
How Do You Build a Concrete Pier Foundation for a Shed?