
The dream of adding a shed to your property is a powerful one. It promises organization, creative space, or a quiet retreat. But as you scroll through endless images of charming cottages, sleek modern studios, and sprawling workshops online, a familiar anxiety can creep in: “Could I actually build that?” The chasm between a stunning Pinterest image and the reality of your own DIY skills can feel vast and discouraging.
Here’s the liberating truth: not every shed design is meant for every builder. The key to a successful, satisfying project isn’t about forcing yourself into a complex plan; it’s about selecting a design that harmonizes with your honest skill level. Choosing appropriately is the difference between an empowering accomplishment and a half-finished, rain-warped monument to frustration.

This guide will help you navigate that choice. I’ll explore shed designs tailored for three broad tiers of experience: the Novice, the Confident Intermediate, and the Advanced Builder. By understanding what each level entails, you can invest your time, money, and energy into a project you’ll not only finish, but will also be proud of for years to come.
4 Tips to Choose a Shed Design That Matches Your Skill Level
Quick Navigation Menu
Part 1: The Foundation of Self-Assessment
Part 2: The Novice Builder – Simple, Sturdy, and Satisfying
Part 3: The Confident Intermediate Builder – Expanding Your Horizons
Part 4: The Advanced Builder – Complex and Custom Creations
Related Reading
I Want a Shed… Now What? How to Start Without Getting Overwhelmed
How Do I Choose the Best Shed Plans? (Paid and Free)
Planning a Shed Building Timeline That Won’t Break Your Spirit
Choosing the Right Shed Size for Your Yard Size
Dealing With Neighborhood Shed Rules: Your Guide to a Hassle-Free Build
Building a Shed as a Homeowner? Avoid These Costly Legal Mistakes
Why Did My Cheap Shed Cost So Much? — Budgeting the Right Way
Why Don’t My Shed Walls Line Up?
Part 1: The Foundation of Self-Assessment
Before we look at a single design, you must have an honest conversation with yourself. This isn’t about ambition; it’s about practical reality.
Ask yourself these questions:
– What is my actual hands-on experience?
– Have you assembled flat-pack furniture? Built a planter box? Framed a wall? Installed flooring? Be realistic. There’s no shame in being a beginner, every expert was one once.
– What tools do I own, and am I comfortable using them?
A design requiring complex compound miter cuts is a nightmare if you only own a handsaw. Assess your arsenal. A novice can thrive with a circular saw, drill, level, and hammer. Intermediate builders might add a miter saw and nail gun. Advanced builders have a shop at their disposal.

– What is my tolerance for problem-solving and learning?
Even simple builds have moments where things don’t line up perfectly. Are you willing to watch tutorial videos, re-do a step, or troubleshoot a warped board? Your patience is as crucial as your skill.
– What is my budget for tools and potential mistakes?
A more complex design often requires specialized tools and assumes a lower margin for material-wasting errors. Factor in potential tool rentals or purchases.
Once you’ve placed yourself in a general category, you can explore designs that are engineered for success at that level.
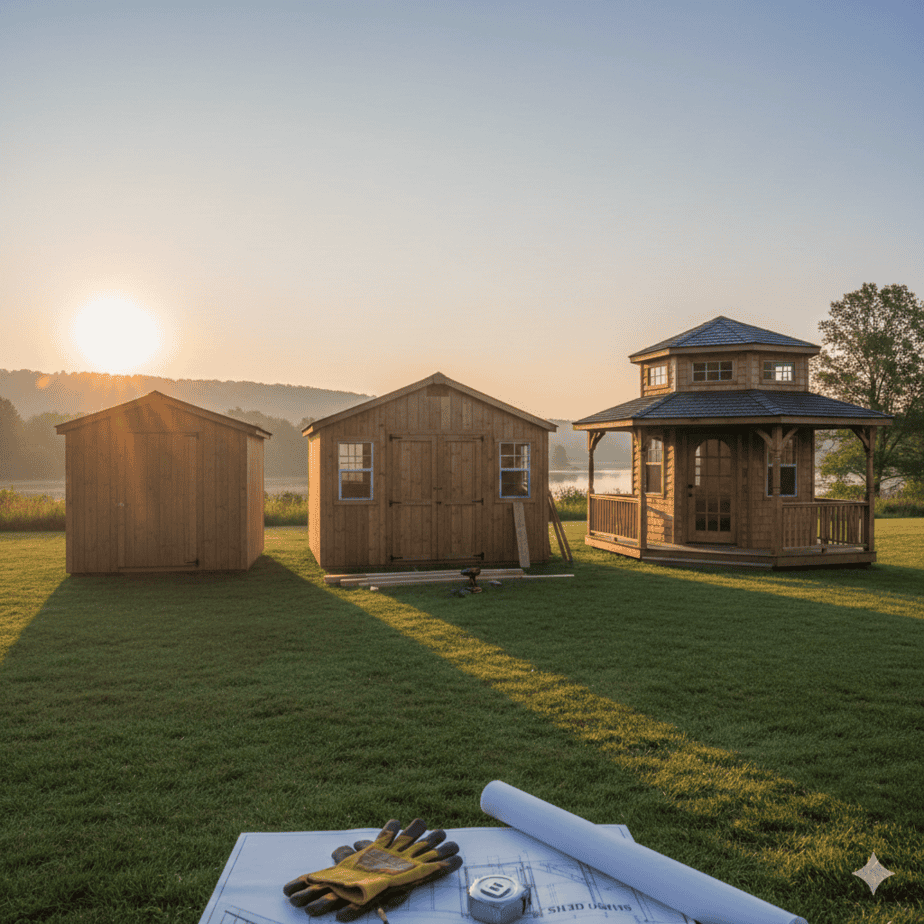
Part 2: The Novice Builder – Simple, Sturdy, and Satisfying
Your Profile: You’re handy around the house for basic tasks. You can follow IKEA instructions, hang a shelf, and are eager to learn. Your tool collection is basic but functional. Your primary goal is a functional structure built correctly, without advanced joinery or architectural complexity.
Design Hallmarks:
Single-Slope (Lean-To) Roof: This is the quintessential beginner-friendly roof. It has only one angle to calculate, uses simple rafter cuts, and is easy to sheath and shingle. Water runoff is straightforward.
Small Square Footage (Under 100 sq. ft): A compact 6×8 or 8×8 shed is manageable. Material handling is easier, and the scale is less intimidating.
Simple Door: A single, pre-hung shed door is ideal. It eliminates the complexity of building double doors that need to align perfectly.
Minimal Windows: One or two small, fixed windows or simple awning windows. Avoid large window walls or custom openings at this stage.
Foundation on Blocks: Using concrete pier blocks on a gravel base is forgiving. It doesn’t require pouring a large concrete slab and allows for minor adjustments to level.
Ideal Design Examples:
The Classic Lean-To Storage Shed: A no-fuss box with a sloping roof, a single door, and maybe a small window for light. It’s all about utility.
The Pre-Cut Kit Shed: While not a custom design, a quality kit from a reputable company is an excellent novice choice. All parts are pre-cut and engineered to fit, with instructions. It’s a crash course in shed assembly with training wheels.

Key Considerations & Tips:
Plans are Non-Negotiable: Do not wing it. Purchase or find detailed, step-by-step plans designed for beginners. Good plans include a cut list and clear diagrams.
Embrace the Skid Foundation: Building the floor frame on pressure-treated skids that sit on concrete blocks is the most forgiving foundation method. It’s adjustable and requires no concrete mixing.
Focus on Square and Level: Your two mantras. Check and re-check every step with your level and framing square. A small error in the floor frame becomes a big error at the roof.
Allow Extra Time: Schedule double the time you think you’ll need. This reduces pressure and allows for learning.
Your Victory: A sturdy, square, weathertight shed that you built. The confidence gained here is the foundation for every future project.
Part 3: The Confident Intermediate Builder – Expanding Your Horizons
Your Profile: You’ve completed a few solid DIY projects. You understand basic framing, are proficient with power tools, and aren’t afraid of making a few cuts to get something right. You own a decent tool collection and are ready for more aesthetically pleasing results.
Design Hallmarks:
Gable Roof: The traditional peaked roof. It requires calculating rafters with plumb cuts and birdsmouth notches to sit on the wall plates. It’s a step up in geometry but offers a classic look and more interior headspace.
Larger Footprint (Up to 120-144 sq. ft): You’re comfortable handling full sheets of plywood and longer framing members.
Enhanced Features: Double doors for equipment access, multiple windows (perhaps even a charming window box), a loft for storage, or simple porch overhangs.
More Finished Interiors: Thoughtful interior sheathing, proper electrical planning (running conduit for lights/outlets), and built-in shelving or workbenches.
Ideal Design Examples:
The Traditional Gable Workshop: A spacious shed with double doors, windows on two sides, and a high-peaked roof ideal for a storage loft. It’s a versatile space for tinkering and storage.
The Saltbox Shed: A stylish variation where the roof has a longer slope on one side, offering more weather protection and unique aesthetics. It introduces asymmetrical design.
The Modern Studio Shed: Clean lines, larger windows (using modern flashing techniques), and vertical siding like board-and-batten. Focuses on creating a pleasant interior environment.

Key Considerations & Tips:
Master the Rafter Template: For a gable roof, spend time perfecting your rafter pattern on a 2×6. Use this single template to cut all identical rafters. This consistency is everything.
Plan for Systems: If you want electricity, plan the conduit runs during framing. Think about interior lighting placement and switch locations before the walls are closed up.
Experiment with Materials: This is the level to try using Hardie board siding, architectural shingles, or decorative trim. Your skill allows for materials that enhance durability and curb appeal.
Site-Built Doors: Consider building a custom-sized double door rather than buying pre-hung. This allows for perfect fit and a custom look, teaching you about bracing and hardware installation.
Your Victory: A shed that is not just functional, but a distinct and attractive feature of your property. It reflects a higher level of craftsmanship and planning.
Part 4: The Advanced Builder – Complex and Custom Creations
Your Profile: You have significant experience in construction or ambitious DIY. You own a comprehensive workshop, understand load-bearing principles, and can visualize complex assemblies. You see a shed not just as storage, but as an architectural statement or a highly specialized space.
Design Hallmarks:
Complex Roof Lines: Gambrel roofs (classic barn style), intersecting gables, dormers, or even gentle curved eaves. These require advanced framing knowledge and precise execution.
Full Foundations: Pouring a reinforced concrete slab with imbedded anchor bolts or constructing a full perimeter stem wall.
Full Utilities: Professionally integrating electrical sub-panels, insulation, drywall, climate control (mini-split units), and even plumbing for a sink.
High-End Finishes: Using real wood siding (cedar shingles, tongue-and-groove), metal roofing with standing seams, custom cabinetry, and detailed trim work.
Ideal Design Examples:
The Gambrel Barn Shed: Maximizes interior loft space with its iconic barn shape. Requires understanding how the upper and lower rafters bear on the wall and tie together.
The Cabin-Style Retreat: A fully insulated, wired, and finished small building that’s a true extension of the home. May include a small deck, French doors, and extensive interior finish work.
The Pavilion or Garden House: A structure with open sides, supported by large posts with complex joinery, perhaps with a decorative cupola. Focus is on aesthetics and integrating with landscaping.
Key Considerations & Tips:
Engineering Matters: For larger spans or complex roof designs, consider having an engineer or architect glance at your plans. This is especially important in areas with heavy snow loads.
Sequence is Critical: Complex builds have a strict order of operations. You must plan the entire process from foundation to finish to avoid painting yourself into a corner (sometimes literally).
Embrace Specialized Tools: You’ll likely use tools like a pneumatic framing nailer, a roofing nailer, a plate joiner for cabinetry, or a sliding compound miter saw for precise trim.
It’s a Marathon, Not a Sprint: These projects can take months of dedicated work. Patience and meticulous attention to detail at every stage are paramount.
Your Victory: A professional-grade, custom outbuilding that adds significant value and beauty to your property. It is a testament to your mastery of the craft.

Conclusion: Building Your Confidence, One Board at a Time
The most beautiful shed in your neighborhood isn’t necessarily the most ornate; it’s the one that is well-built, cohesive, and proudly maintained. By choosing a design that aligns with your honest skill level, you set yourself up for the profound satisfaction of a job done well.
There is no glory in struggling through a build that constantly outpaces your knowledge, leading to a shaky, leaky result. There is immense glory in expertly executing a plan suited to you, resulting in a structure that is square, solid, and exactly what you needed.
Start where you are. Use what you have. Build your skills with a project that challenges you just enough. Whether it’s a humble lean-to that clears your garage or a gorgeous gambrel that becomes your sanctuary, the right design for your level is the cornerstone of success. Now, with that self-awareness, you can look at those inspiring pictures not with intimidation, but with a discerning eye, knowing exactly which beautiful design is meant for you to build.